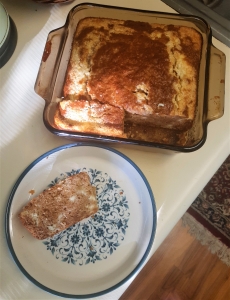
Pub Style Shepherd’s Pie Recipe

Pub-Style Shepherd’s Pie Recipe

Bring the Irish Pub into your kitchen this St. Patrick’s Day with our hearty shepherd’s pie recipe.

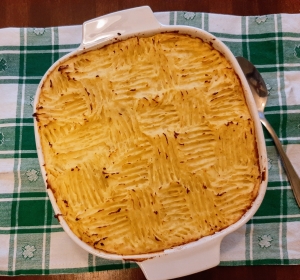
This deliciously savory dish combines rich lamb with a thick herbed tomato sauce and creamy mashed potatoes. After being perfectly crisped on top in the oven, you could feed a small party or enjoy the leftovers all for yourself, since there will be plenty to go around,.


Ingredients for the filling:

1 lb. ground lamb (or beef if preferred)

1 yellow onion

2 tbsp minced garlic

2 tbsp dried parsley

½ tbsp dried rosemary

1/2 tbsp dried thyme

1 tsp salt (or to taste)

½ tsp ground black pepper (or to taste)

1 tbsp olive oil

1 tbsp Worcestershire sauce

2 tbsp all-purpose flour

2 tbsp tomato paste

1 cup beef broth

1 cup frozen peas

2 medium carrots


Ingredients for the topping:

2 lbs. gold potatoes

2 tbsp salt, divided

4 tbsp butter

¾ cup milk

1 egg


Instructions:

First, get started on your mashed potatoes. 

Pour 4 cups of water into a large pot and add one tablespoon of salt. Bring it to a boil. 

While your water is beginning to boil, wash and dry your potatoes. Peel them and chop them into large pieces. Once the water is boiling, add your potatoes. 

Next, you can move on to your filling and prepare your vegetables.

Chop your onion and mince your garlic. Wash and peel your carrot, and chop it into small pieces. 

Add your olive oil to a cast iron skillet (or regular skillet). 

On medium-high heat, cook your onions and carrots. Sauté the onions until they start getting a little color, about 2 minutes. 

Add your garlic and cook until fragrant, about another 3 minutes. 

Crumble in your ground lamb and break it apart as it it’s cooking, and stir to keep it from getting too brown on one side. 

Once the lamb has gotten a little color on it, add your dried parsley, dried rosemary, dried thyme, salt and black pepper to the skillet. Stir for another 3 minutes or so. 

Once your herbs are fragrant, add the tomato paste, beef broth, and cup of frozen peas. Stir until combined. 

Add your all-purpose flour and stir until it’s incorporated. Simmer for 10 minutes, until it thickens. 

Preheat your oven to 400°F. 

Your potatoes should be done boiling by this point, so you may set your skillet aside while you make your mashed potatoes. 

Drain your potatoes, then pop them back into your pot on the stove for a minute or two. This will dry off any excess water. 

Add your butter, milk, and salt to the potatoes.

Mash your potatoes until they are smooth and you see no remaining chunks. This will take some time and arm power, but it will be worth the effort. 

Once your potatoes are smooth, crack your egg into a separate bowl or cup. Whisk it together, then add it into the potatoes. Stir until combined. 

Spoon your mashed potatoes on top of your meat filling in your cast iron skillet. If you’re not using cast iron, I recommend you transfer your meat filling into an oven-safe casserole dish that’s at least 8 inches by 8 inches. 

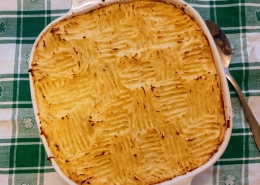
Make sure your potatoes are spread in an even layer, then rough them up on top in a pattern of your choosing. This will help the top crisp up in the oven. 

Transfer your shepherd’s pie into the oven and bake uncovered for 25 minutes. Broil it for 5 to crisp up the top if you’d like it to have a little more color. 

Allow it to cool and serve. This Shepherd’s Pie will keep for up to a week in the refrigerator if covered properly. 


Like this recipe? Explore more of our recipes here.

First Fridays at the Co-op – 12 Years of Local Love


Our 12th Birthday is on June 6th and we’re celebrating! Stop in on Friday June 2nd from 5:00-7:00PM to see our 12 Years of Local Love First Friday exhibit. This series features photos from our last 12 years in business, and highlights values that we have held since the very beginning!

Come out and look into the past, enjoy light refreshments from the store, and spend some time basking in the local love!

We hope to see you here, but if you can’t make it for the opening the photo exhibit will be up for the entire month!

Alternatives to Eggs

You’ve probably noticed that eggs have been difficult to find and rising in price at most larger chain grocery stores. This is largely due to an outbreak of the Avian Flu that is sweeping across the nation, affecting flocks of fowl both large and small. 

At the co-op we’ve been able to keep eggs on the shelves and prices low because of our awesome local providers, but with the potential threat of the Avian Flu spreading to our area – we wanted to present you with some egg alternatives! 

Egg Alternatives for Baking:

  • Water, Baking Powder, & Oil – Combine 2 Tbsp of water, 1 tsp of baking powder, and 1 tsp of vegetable oil for every egg needed. 
  • Carbonated Water – Use ¼ cup of unflavored sparkling water for every egg needed.
  • Yogurt or Buttermilk – Use 1/4 cup of plain unsweetened yogurt or buttermilk for every egg needed.
  • Vinegar & Baking Soda – Mix 1 tsp of baking soda with 1 Tbsp of vinegar for every eg
  • Unsweetened Applesauce – Use ¼ cup of applesauce for every egg needed.
  • Flax Seed OR Chia Seeds – Combine 1 Tbsp of Flax OR Chia seeds with 3 Tbsp of water for every egg in the recipe and let sit for 10-15 minutes. Add them to your batter once they become gelatinous. 
  • Egg Replacement Powders Bob’s Red Mill makes one & so does Ener-G
  • Aquafaba – This is the liquid found in a can of chickpeas. Great for replacing egg whites! Use 2 Tbsp per egg white. Can be whipped into meringues!


Egg Alternatives For Breakfast: 

  • Tofu + Turmeric – Tofu is a great egg substitute for breakfast, and if you crumble it and then season with some turmeric it will even look like scrambled eggs! We like these recipes for flavorful scrambles! 
  • Just Egg – This is an egg replacement that you cook the same way you would scrambled eggs! You can find detailed instructions here.

As always, we will weather these times together! If you’d like to view our egg replacement options visit our Co-Go website!

Potato Leek Soup

There’s nothing like settling in with a hot bowl of soup to warm you up during the coldest time of the year. This wonderfully savory and smooth potato leek soup will certainly do the trick, plus it’s vegetarian and can be made vegan. We hope you enjoy this comforting soup during the cold months ahead.

Ingredients:

2 lbs. yukon gold potatoes

6 cups vegetable broth 

4 leeks 

3 garlic cloves

1 tsp salt

½ tsp dried thyme

¼ tsp black pepper

½ cup plain greek yogurt (optional)


Instructions:

Begin by preparing your vegetables. Chop and clean your leek. You can do this by chopping your leek in half lengthwise, stopping where the fronds start emerging from the stalk. Turn the leek over on its side by 90 degrees and chop again, cutting it into 4 segments. Fan out the sections on the inside of the leek, using the fronds as a handle. Wash out any dirt inside the leek. Press the sections back together and chop finely. Set aside. 

Wash and peel your potatoes. Chop them into chunks and set aside. 

In a large stockpot, add your oil and leeks. Cook them for about 10 minutes, stirring occasionally to cook them evenly. Add your garlic, thyme, salt, and pepper and cook for another 5 minutes. 

Pour in your vegetable broth and potatoes. Bring the pot to a boil, then reduce the heat to medium and cover with a lid. Let it simmer for 30-40 minutes, stirring occasionally to keep things from sticking to the bottom of the pot. 

Once your soup has finished simmering, remove from heat and allow it to cool 10-15 minutes. 

Using an immersion blender, food processor or a regular blender, blend the soup until smooth.

Note: You may have to do this in batches depending on the size of your blender or food processor. If you are using a blender, I recommend waiting until the soup has completely cooled before blending, as the pressure of a hot liquid in a sealed blender can be dangerous and cause your blender to leak or possibly explode. You can then reheat the soup in the pot before serving. 

Stir in your yogurt, if using, and serve. Enjoy!


Vegan Cheese Ball

Making an appetizer that pleases everyone can be quite the feat, but this vegan cheese ball is up for the challenge. This creamy and savory recipe can be paired with crackers or vegetables to fend off your hungry guests until dinner is ready. This cheese ball is vegan and packed with flavor so everyone can enjoy every bite. We hope you enjoy this retro recipe.

Ingredients:

8 oz vegan cream cheese
1 cup vegan cheddar cheese, shredded
1 green onion
2 tsp vegan Worcestershire sauce
½ tsp dried parsley flakes
½ tsp dried garlic powder
½ tsp dried oregano
⅙ tsp black pepper (a pinch)

Coating:

½ cup vegan cheddar cheese, shredded

Instructions:

Take your vegan cream cheese out of the refrigerator to soften 5 to 10 minutes before you begin making your cheese ball.

In a large bowl, add your vegan cream cheese and beat it with a hand mixer until smooth. You can also smooth it with a heavy wooden or metal spoon, which will take a little longer. Set aside.

Chop your green onions and add them to the cream cheese.

Add your shredded vegan cheddar to the bowl along with your vegan Worcestershire sauce, parsley flakes, garlic powder, oregano and black pepper. Stir until the ingredients are evenly combined and there are no clumps of unincorporated vegan cream cheese.

With clean hands, form the cream cheese into a ball.

Using either beeswax wrap, a cheesecloth, or plastic cling film, tightly wrap the cheese ball to help it keep its shape. Set it in the refrigerator for at least one hour to chill.

After it’s chilled and set in its shape, remove the wrapping and pat on the remaining vegan cheddar shreds to coat the cheeseball.

Serve immediately with crackers or celery sticks or save it in the refrigerator for up to one week. Enjoy!

Vegan Mushroom Stroganoff

Fall marks the beginning of warm, comforting dinners and the upcoming holiday season for many of us. While seasonal festivities are fun, they can make us so busy that it’s difficult to find time to prepare ourselves a home-cooked meal. This vegan mushroom stroganoff recipe is great for nights when you want something quick and easy, but still satisfying with deliciously savory mushroom flavor. It’s also very adaptable and you can always add in your favorite vegan protein for an even heartier meal. We hope you enjoy this recipe!

Ingredients:

3 cups cremini or baby portabella mushrooms
1 yellow onion
1 cup vegetable broth
1 cup non-dairy milk (I used unsweetened plain almond milk)
2 T neutral oil or non-dairy butter
¼ cup of flour
1 tsp salt
1 tsp dried thyme
¼ tsp black pepper
2 cups rotini or fusilli pasta (uncooked)

Instructions:

Cook your pasta according to the instructions on the package. Strain and set aside.

While your pasta is cooking, you can begin preparing your vegetables.

Chop your onions and mince your garlic. Slice your mushrooms.

In a large saucepan, add your oil or non-dairy butter and set to medium-high heat. Add your onions and garlic. Cook for 5 minutes until your onions are translucent and the garlic becomes fragrant.

Toss in your mushrooms and set the pan to medium heat. Cook for another 5 to 10 minutes, or until the mushrooms have lost most of their liquid.

In a measuring cup or bowl, add your flour, non-dairy milk, vegetable broth, salt, pepper and thyme. Mix thoroughly with a fork or whisk and pour it into the saucepan.

Cook for 5 to 10 minutes while stirring continuously, whisking out any clumps of flour. When the sauce has thickened and there are no clumps of flour remaining, take the sauce off of the heat.
Stir in your pasta to incorporate it into the sauce. Allow it to cool before serving.

Serve and enjoy!

Apple Cheesecake Swirl Bread

From the very beginning of Autumn, all kinds of local apples arrive at the Co-op. This sweet bread recipe is another delicious way to enjoy some fall flavors without spending all afternoon in the kitchen. Warm spices and sweet apples come together with a creamy cheesecake filling to ring in the new season. We hope you enjoy this recipe!

Ingredients:

2 apples (sweet varieties like honeycrisp or pink lady)
1 cup sugar
2 eggs
½ cup neutral oil (sunflower or canola work the best)
1 tsp vanilla extract
2 cups flour
1 tsp baking soda
½ tsp cinnamon
⅛ tsp nutmeg

For the cheesecake filling:

8oz cream cheese, softened
½ cup sugar
1 egg

Instructions:

Preheat your oven to 350°F.
Prepare an 8×8 inch or 9×9 inch baking pan with butter or cooking spray and set aside.

In a medium mixing bowl, add your cream cheese, sugar and egg. Mix well with a hand mixer until smooth. Set aside.

Grate your apples, with the peel on, into a large mixing bowl.

Add your sugar, eggs and vanilla to the apples and mix to combine.

Without mixing, add your flour, baking soda, cinnamon and nutmeg. Gently fold them together until just combined.

Pour half of your batter into your prepared pan. Next, pour your cheesecake filling into the pan in an even layer. Pour the remaining batter on top.

Stick a butterknife into the batter and gently swirl it around. This will add the “swirl” to your bread. It’s ok if some rises to the top during or after you’ve done this step.

Put your bread in the oven for 40-50 minutes, or until a fork inserted in the bread comes out clean.

Allow it to cool and enjoy!

Ratatouille (Vegan)

There’s no better way to enjoy the fruits of your garden than preparing a delicious dish. Even if you don’t garden, this recipe can be made using local produce you can find in the late summer, and it will taste incredible either way. Ratatouille can be an ambitious dish, so make sure you set aside plenty of time for preparation and cooking time when you make it. It’s perfect for when you want to impress company or prepare something special for yourself. This dish perfectly captures the flavors of late summer with an Italian twist. We hope you enjoy!

Ingredients:
1 large eggplant
2 red slicer tomatoes
1 large yellow squash
1 large zucchini

For the sauce:
2 T olive oil
1 yellow onion
2 cloves garlic
1 red bell pepper
3 tomatoes
2 T fresh basil leaves
1 tsp oregano (fresh or dried)
1 tsp black pepper
1 tsp salt

For the topping:
3 tsp olive oil
2 T fresh basil leaves
2 cloves garlic
2 tsp thyme (fresh or dried)
⅛ tsp black pepper
¼ tsp salt

Optional:
1 cup dry white basmati rice

Instructions:
First, find a large and deep pan to use for your ratatouille. If desired, fill the bottom of your pan with one cup basmati rice and set aside.
First, prepare your sauce.
Chop the ends off your bell peppers and cut them in half. Remove the pith and seeds.
Place your bell peppers cut-side down on a large baking sheet. Put your three tomatoes on the baking sheet as well.
Broil the peppers and tomatoes in the oven for 10-15 minutes, until they begin to blister on top.
Once your tomatoes and peppers are done broiling, set them aside to cool.
While they are cooling, you can dice your garlic cloves and chop your onion.
Sauté your onion and garlic in a pan with 1 tablespoon of olive oil, until the onions are translucent and the garlic is fragrant. Set them aside to cool
When your peppers and tomatoes are mostly cooled, peel the skin off of your tomatoes.
Transfer the tomatoes, peppers, garlic and onion to a large food processor. Add your fresh basil leaves, 3 tablespoons of olive oil, salt, pepper and oregano to the food processor as well.
Blend until smooth and transfer your sauce into your baking pan. Set aside.
Next, prepare the topping. Add your garlic cloves to a food processor with your fresh basil leaves, olive oil, thyme, salt and pepper. Blend until smooth. Set aside.
Preheat your oven to 375°F.
Prepare the vegetables for your ratatouille. Slice your eggplant, squash, zucchini and tomato into ½ inch thick slices. Set aside.
To assemble your ratatouille, pour the sauce into the pan in an even layer.
Add your vegetables to the pan, slice by slice, alternating between the four vegetables. I recommend putting the vegetables upright, as shown in the photo. Make sure you push them into the sauce as you place them into the pan.
Once you’ve added all the vegetables to the pan, gently pour your topping over them. It will be a runny paste consistency, so doing scoops of it here-and-there will do the trick.
Put it in the oven, covered, for 40 minutes. Remove the cover and bake for another 10.
Allow it to cool before serving and enjoy!

No-Churn Peach Ice Cream

We can’t think of a better way to enjoy the flavors of summer than cooling off with homemade ice cream with fresh fruit. This recipe requires just a few simple ingredients and a hand mixer, so it’s a perfect set-it-and-forget-it recipe for the heat of August in Virginia. Because this ice cream doesn’t have any extra stabilizers in it, it freezes up quite solidly. You’ll want to leave it out for 5-10 minutes to thaw a bit before serving, after which it will be soft enough to scoop and enjoy a refreshing treat.

Ingredients:

8 ripe peaches
2 cups heavy cream
(1) 14 oz can sweetened condensed milk, chilled
2 tsp vanilla extract
⅛ tsp of salt

Instructions:

Put your sweetened condensed milk in the refrigerator to chill.

Wash and peel your peaches. Slice them into wedges. Roughly chop them and set them aside.

This is an optional step, but if you have a blender or food processor you can blend half of your chopped peaches. This will give your ice cream base a more powerful peach flavor than just using the chopped peaches. If you decide to blend half your peaches set them aside with your other peaches while you make the whipped cream.

In a large bowl, add your heavy cream, salt, and vanilla extract. Whip your heavy cream to stiff peaks, but be careful not to whip it too long and curdle it. You should stop right after the cream has doubled in size and has become stiff in the bowl.

Add your chilled sweetened condensed milk. Gently stir in a “figure 8” motion to keep from flattening the air out of your whipped cream.

Once the sweetened condensed milk is incorporated, add your chopped peaches and blended peaches if you chose to do that step.

Gently incorporate the peaches by stirring in a “figure 8” motion.

Transfer into a freezer-safe container that can hold up to 6 cups volume and cover with the container’s lid or plastic wrap. If you don’t have a container that will hold that volume, you can easily transfer it into 2 different containers. I recommend using 2 loaf pans and covering them with plastic wrap. You can always send the extra container off with someone else to share.

Put your ice cream in the freezer to set overnight or at least for 8 hours.

Allow the ice cream to thaw for about 5-10 minutes before serving and enjoy!

Summer Quick-Pickles

If your garden is overflowing with cucumbers, quick-pickling is a great way to preserve them. Using rice vinegar in place of white vinegar gives these pickles a unique flavor, along with classic pickling spices dill and garlic. These will last up to 2 weeks in the fridge, and are a delightfully crunchy and tangy topping on Asian dishes, salads and even in sandwiches.

Ingredients:

1 ½ cups rice vinegar
3 cloves garlic (3 T if using pre-minced)
8 small cucumbers (or 3 large, depending on what variety you’re growing in your garden)
1 generous bunch fresh dill

Instructions:

Mince your garlic. Set aside.

Wash your cucumbers and peel or cut off any bad spots on your cucumbers. You can choose to completely remove the peel from your cucumbers if you prefer, but it is not necessary.

Slice your cucumbers to about ¼ of an inch in thickness.

In a large dish with an airtight lid, put half of your sliced cucumbers. Lay about half of your minced garlic and dill on top of the layer of cucumbers. Repeat this with the other half.

Pour your rice vinegar on top and put the lid on your dish.
Refrigerate overnight or for at least 8 hours before serving. Enjoy!