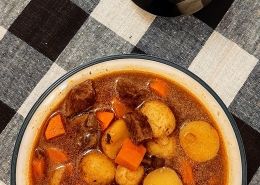
Last month, we added several new goat cheeses to our cheese island that are downright delicious. You might remember goat cheese as soft and spreadable, also known as chèvre. We have quite a few types of chèvre, but it’s not a perfect substitute for the cheese on your pizza or in your macaroni and cheese.
Our new Mozzarella, Cheddar and Pepper Jack goat cheeses from LaClare Family Creamery® are perfect for any recipe and are incredibly similar to their cow’s milk counterparts. We highly recommend them to anyone who finds goat’s milk to be gentler on their digestive system, or if you’d like to try them out.
If you’re looking to take these goat cheeses for a spin, why not test them out on a pizza? We’ve tried it ourselves and it was simply delicious, not to mention perfectly cheesy. You can use store-bought pizza dough and pizza sauce to make your scrumptious slices, but we also have a from-scratch recipe you can refer to if you’re feeling more adventurous. We hope you enjoy these great new goat cheeses.
Goat Mozzarella Pizza
INGREDIENTS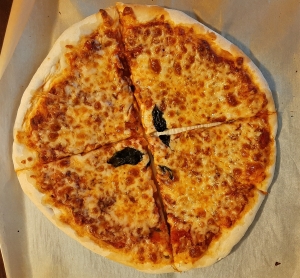
For the pizza dough:
2 cups flour
1 tsp salt
¾ tsp active dry yeast
1 tsp olive oil
¾ cup lukewarm water
¼ tsp sugar
For the pizza sauce:
6-8 Roma tomatoes
¼ an onion
2 cloves garlic
2 T olive oil
1 T salt (or to taste)
2 T Italian seasoning
¼ cup water
For the topping: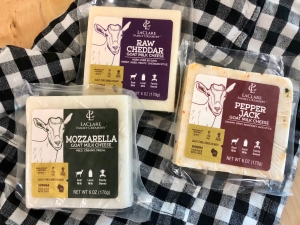
LaClare Family Creamery® Goat Mozzarella cheese
Basil
Instructions:
Pour the yeast into your cup of lukewarm water and add your sugar. Allow it to rest for 5 to 8 minutes, until the yeast has begun to bubble, and it smells strongly of yeast.
While your yeast is blooming, put your flour and salt into a large bowl.
When your yeast has bloomed, add your olive oil, and stir gently to combine.
Pour your yeast mixture into the flour and stir to combine. When your dough begins to come together, you will need to use your hands to mix it.
Once your dough has come together, it’s time to knead it. Place your dough ball on a floured surface and knead it for about 15 to 20 minutes, adding flour as you go to prevent your hands from sticking. Your dough ball will be ready when it bounces back from your touch but no longer sticks to your hands when you touch it or knead it.
When your dough is done, cut it into 2 segments and shape them into tight balls before allowing them to rest.
Your dough now needs to rise. Cover your dough balls with a damp towel in a warm place, but out of direct sunlight. Allow them to sit for at least 1 hour, or until they have roughly doubled in size.
While your dough is rising, you can make your tomato sauce.
Dice your onions. Put them in a large saucepan with your olive oil on medium heat.
Peel and dice your garlic. Add them to the saucepan.
Remove the seeds from your tomatoes and cut them into rough slices. If your onions are translucent and your garlic is fragrant, add your tomatoes to the pan. Add your water to the pan as well.
Add your salt and Italian seasoning to the pan and stir to combine.
Cover your pan and allow it to simmer on medium heat for 10 minutes.
Once it has simmered, use the back of your spoon to crush the tomatoes further. Allow the sauce to simmer for 5 minutes longer uncovered.
While you wait for your dough to rise, you can also prepare your cheese. LaClare Family Creamery® Goat Mozzarella cheese comes as a block, so you will need to grate using a box grater to make it into shreds for your pizza. You can also slice it very thinly with a vegetable peeler and cut it with a sharp knife to create shreds if you don’t have a grater.
When your dough has risen, heat your oven to 500℉ and place a large sheet pan in the oven to act as your pizza stone.
On a large sheet of parchment paper, stretch out your pizza dough to your desired shape. I recommend making it about ½ inch thick all around to prevent it from cooking unevenly.
Spread your sauce on your pizza using a large spoon. It’s ok if you see some spots of dough from beneath the sauce, as this will prevent a soggy pizza.
Using about half of your shredded cheese, sprinkle your cheese on top of the pizza. Make sure to spread it evenly to avoid the cheese pooling in one spot.
Add your fresh basil on the pizza, or any other desired toppings.
Using oven mitts, remove your sheet pan from the oven and place it on a heat-resistant surface.
Transfer your pizza to the sheet pan, keeping it on the parchment paper.
Cook the pizza for 10-12 minutes, or until the cheese has melted and the crust becomes sandy brown in color.
Remove your pizza from the oven onto a heat-resistant surface. Allow it to cool 5 minutes before cutting it using a pizza cutter or knife.
Slide your pizza onto a plate using the parchment paper and enjoy!

 Hi, there! I’m Corey. I started Red Root & Co to create herbal goods that support mind and body, bringing botanical goodness to our community through foods, beverages and herbal remedies. Since I was a small child, I’ve been drawn to preparing kitchen goods for loved ones. As an adult, my love for plants and the natural world grew. The confluence of my background in sociology, permaculture, and herbalism, inspired the creation of Red Root & Co, a place to craft botanical goods with great care and thoughtfulness for both the environment and social world. I’m excited and encouraged as we continually refine our herbal craft processes and explore new ways to incorporate more regionally grown produce, flowers, and herbs with wild harvested botanicals.