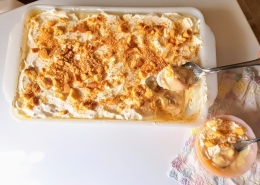
Vegan Salted Pistachio & Chocolate Toffee

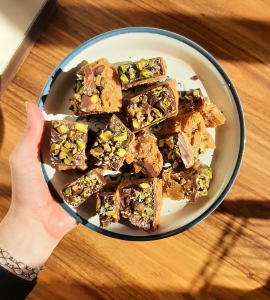
Get into the spirit of St. Patrick’s Day with this delightful recipe for toffee, made vegan! Toffee is usually made with butter and cream, but we opted for all vegan ingredients and put our own spin on this classic candy with pistachios and sea salt. Toasty caramelized sugar pairs wonderfully with a smooth chocolate coating and crunchy pistachios to make a perfectly balanced sweet treat.

Ingredients:
2 cups vegan butter
2 ½ cups white sugar
1 T maple syrup
1 cup canned coconut milk (full fat)
1 tsp salt (if using unsalted vegan butter)
For the topping:
1 ½ cup pistachios (or nut of your choice)
10 oz vegan dark or semi-sweet chocolate
1 T flaky finishing salt (or to taste)

Instructions:
Before you begin making your toffee, you’ll want to get all your ingredients prepared and have your tools ready. When it’s finished, the toffee will be extremely hot, and you’ll need to move quickly to keep the sugar from burning. With this prep, you’ll likely save yourself from getting burnt as well.

First, roughly chop your pistachios. In a large pan, toast the pistachios on medium heat for 5-7 minutes, stirring frequently to keep them from burning. Then transfer them into a large bowl and set aside.

Chop your vegan chocolate into small chunks if you’re using a baking bar. Transfer it into a microwave safe bowl and set aside.

If you prefer not to use a microwave, you can use a double boiler method and have your chocolate melting before you start the toffee. To create a double boiler at home, you’ll need a pot and a heat-safe bowl that fits on top of the pot without falling inside of it. Take the large pot and fill it up halfway with water. Bring it to a boil and place the heat-safe bowl over the pot and add your chocolate to the bowl. Bring the heat down to medium-high and make sure to stir the
chocolate often to prevent it from burning at the bottom of the bowl. The chocolate will melt and once melted, you can reduce the heat to low and stir occasionally to keep it from solidifying again

Prepare a 9×12 baking pan by lining it with parchment paper. Set it aside, but still close enough that you will not have to move very far once you’re ready to pour your toffee into the pan. Make sure you have it set on top of something such as a heat-proof mat, serving tile or a thick towel to keep the heat from potentially melting your countertops.

Have your whisk, oven mitts and a candy thermometer close by. In a pinch, you can use a meat thermometer or an instant-read thermometer, whatever you have on hand so long as it can read up to 300℉.

Now that you’re all set up, you can begin making your toffee.

In a large soup pot, add your vegan butter. Melt it on low heat until there is no solid butter left. Add your sugar, maple syrup and canned full-fat coconut milk. Whisk to combine.

Turn the heat up to medium-high and stir constantly until the sugar dissolves, making sure to scrape down the sides of the pot. The undissolved sugar will make a gritty, scraping sound as you take the whisk down the side of the pot. When you no longer hear that sound, you’re ready to move on to the next phase.

Put on your oven mitts or heat-proof gloves and turn the heat on high. Insert your candy thermometer and stir the mixture constantly as it boils. Keep going until it reaches 285℉. This may take up to 15-20 minutes and by the time it is ready, it will appear thick and foamy with large, loud bubbles.

As soon as the toffee reaches 285℉, turn off the heat and remove the candy thermometer.

Quickly pour the toffee into your prepared pan, scraping out the remnants with your whisk.

Sprinkle ½ of your pistachios on top of the molten toffee.

Pour your melted vegan chocolate overtop of the toffee and pistachios in an even layer.

Sprinkle the top with your remaining pistachios and finishing salt.

Allow the toffee to cool down for about 10-15 minutes, then put it in the refrigerator to set for 4-5 hours.

Once set, remove it from the pan and break it into pieces.

Keep it sealed and refrigerated and enjoy your toffee for up to 2 weeks.

Vegan Udon Noodle Stir Fry

Can’t decide what’s for dinner? Look no further than this quick-and-easy recipe for a deliciously savory stir-fry with nutritious vegetables and protein. These noodles work wonderfully for lunch leftovers and satisfy cravings for takeout noodles, without sacrificing any flavor. If you’re a meat eater, any meat protein could easily be substituted in. 

Ingredients:

1 8 oz package of udon noodles

1 6 oz to 8 oz package of plain seitan (or homemade seitan)

2 carrots

2 heads of baby bok choy

1 bunch of spring onions or scallions

4 cloves of garlic (pre-minced is fine)

6 T tamari 

2 T sesame oil

1 tsp sugar

½ tsp ground ginger


Instructions:

In a medium-sized pot, bring 3 cups of water to a boil while you prepare your vegetables. 

Thinly slice your green onions and set them aside in the refrigerator. 

Peel and mince your garlic if you’re not using pre-minced. Set aside. 

Wash your carrots and baby bok choy. 

Peel your carrots and julienne them, then set them aside. 

Chop the leaves of your baby bok choy into strips about ½ inch wide and set aside. 

By the time you’ve finished prepping your vegetables, the water in your pot should be boiling. Add your noodles and set a timer for 6 minutes. 

In a large pan, add 1 tablespoon of sesame oil and garlic. Cook on medium heat until the garlic becomes golden and fragrant, about 1-2 minutes, stirring occasionally. 

Add your carrots and seitan. Sauté them for 2-3 minutes, until they begin to soften. Then toss in your baby bok choy and cook for 2-3 minutes. Stir occasionally. 

When the timer for your noodles goes off, turn off the heat and strain them. Add them to your pan, but don’t stir them right away. 

In a measuring cup, add your tamari, sugar, ground ginger, and 1 tablespoon of sesame oil. Whisk until combined, then add it to your pan. 

Stir the dish until the sauce evenly coats the noodles, then turn the heat up to medium-high and cook for another 5 minutes to allow some of the noodles to crisp up. 

Garnish with your spring onions and serve. Enjoy!


Vegan Linzer Cookies

These festive Linzer cookies can be cut into any shape you’d like; snowflakes for winter, flowers for spring, or hearts for Valentine’s Day like we’ve done for this batch. Subtly sweet and buttery, they pair wonderfully with any flavor of jam or fruit preserves sandwiched between them. Whether you dust them with powdered sugar or leave them plain, they make for a delightful treat for you or your valentine to enjoy. 


Ingredients:

12 T vegan butter (room temperature)

½ cup granulated sugar

1 tsp lemon zest

1 tsp vanilla extract

1 ⅓ cup all-purpose flour

¾ cups almond flour

¼ tsp salt (omit if you’re using salted vegan butter)

A jar of jam or fruit preserves for filling

Powdered sugar for decorating

Instructions:

Preheat your oven to 350°. Prepare two large baking sheets with parchment paper and set aside. 

Zest about ½ of your lemon into a large mixing bowl. This will come out to about a tablespoon, or a little more depending on the size of your lemon. 

Add your vanilla, sugar, and room temperature vegan butter to the large bowl with your lemon zest. 

Beat until well combined and the mixture is light and fluffy. Set aside. 

In a medium mixing bowl, sift together your flour, almond flour, and salt if you’re using unsalted vegan butter. 

Add your dry ingredients to your wet ingredients and mix until they’re just combined. Be careful not to overmix, or your cookies will turn out chewy rather than crunchy. 

Divide your dough in half and set it, covered, in the refrigerator for 10 minutes. If you want to move quickly, you can also put it in the freezer, but only for 5 minutes at a time. Either method will help the butter firm so your dough won’t be a greasy mess while you’re trying to roll it. 

Prepare a surface to roll your dough and sprinkle flour on it and the rolling pin. 

Remove your dough from the refrigerator and roll it into a ⅛ inch thick sheet. 

Cut the dough into shapes using a cookie cutter and repeat until you’ve used as much dough as you can. 

After you’ve cut all your cookies, cut a hole in the center of half of them. You can do this using another cookie cutter, or if you don’t have one small enough, other circular objects in your kitchen such as a bottlecap. Additionally, if you have an uneven number of cookies, I recommend leaving them uncut in case some of your other cookies don’t turn out. 

Assemble your cookies on your prepared baking sheet and bake them for 10-15 minutes, or until the edges begin to turn brown. Every oven is different, but I recommend setting a timer for 12 minutes to see how they’re coming along. The cookies you’ve cut holes into will take less time to bake and I recommend checking on them after 10 minutes to ensure they get too brown. 

Once they’re done, set them on a cooling rack and let them cool completely before you fill and decorate them. 

When they’ve cooled, use a fine sifter to sprinkle powdered sugar on top of the cookies you’d cut a hole in the center of. 

Then, on the underside of each cookie you didn’t cut a hole in the center of, scoop about a tablespoon of jam or preserves and spread it evenly. 

Very carefully, place your sugar-dusted cookies on top of your jam-covered ones and gently press them together so they’ll stick. 

Enjoy! 

Za’atar Lamb Shanks & Roasted Potatoes

Sharing a delicious meal with your special someone is a wonderful way to celebrate Valentine’s Day, or any day that’s special to you. These oven-roasted, za’atar-crusted lamb shanks are the perfect main course for those who have a little extra time on their hands. This recipe may seem difficult, but the only real obstacle is making sure you start cooking early. Once you get the lamb in the oven, it does most of the work with only a few check-ins.

We’ve included a recipe for roasted potatoes as a suggested side, which you can cook alongside the lamb shanks as they’re finishing up. If you’d like a wine to accompany your meal, or a red we’d recommend a Bordeaux or a Chianti. The Bordeaux Rouge from Chartron La Fleur, or Badia a Coltibuono’s Chianti Cetamura would both pair well with this meal. If you prefer white wine, Gai’a Wines’ Monograph Moschofilero would be an excellent choice. All these wines can be found in our wine section towards the back of the store, in addition to many other wonderful selections. No matter what you pair this recipe with, you’re sure to impress your date and enjoy a lovely meal.


Ingredients:
2 lamb shanks, thawed
2 T oil of your choice (sunflower, olive, etc.)
2 T salt (or to taste)
6 T Za’atar (feel free to use more if you need to)
6 cloves of garlic
1 cup vegetable broth

For the potatoes:
1 yellow onion
1 bag of small golden potatoes
2 T oil (sunflower, olive, etc.)
1 T dried rosemary
1 T za’atar (if desired)
Salt and pepper to taste

Instructions:
Preheat your oven to 450°.

Peel your garlic cloves, but only the paper-like husk of the garlic. Leave the innermost peel on and set them aside.

Place your lamb shanks in a large oven-safe roasting pan. It should be deep enough that the lamb shanks are not peeking over the sides of your pan.

Add half your oil, garlic, salt and za’atar to your lamb shanks. Rub the seasonings on them evenly and flip them. Repeat on the opposite side. Make sure to cover every part of the shank with seasoning.

Roast the lamb shanks in the oven for 20 minutes uncovered, then take them out and turn the temperature down to 325°.

Being careful not to burn yourself on the hot pan, wrap your pan in several layers of aluminum foil. Make sure there is no way for air to enter the pan. I recommend 3-4 layers of foil to keep it well-insulated and cover all the sides.

Place it back in the oven and cook for 2 hours.

After 1 ½ hours have passed, get started on your potatoes.

Prepare a large baking sheet with parchment paper. Set aside.

Cut your onion into large slices and lay them on the baking sheet. Cut your potatoes in half and add them to the baking tray.

Add your oil, rosemary, za’atar, salt, and pepper to the tray and shuffle all the ingredients until everything is well distributed.

Put your potatoes in the oven with your lamb. They will cook alongside it until everything is done.

After your lamb has been in the oven for 2 hours, remove it and leave the potatoes in the oven. Turn the oven temperature up to 400°.

Remove the foil from your roasting pan and pour in the vegetable broth. Set it in the oven and cook for another 15 minutes.

Once the 15 minutes is up, remove your lamb and allow it to cool a little before serving. If your potatoes look done to your liking, take them out of the oven as well. If you think they need a little more time, leave them in for another 5 minutes.

Plate your lamb and potatoes, pour a delightful beverage, and enjoy your meal.

Mango Coconut Rice Pudding (Vegan)

Turn over a new leaf this year and expand your palette by trying new recipes. I started the year off sweet with this creamy coconut rice pudding topped with fresh mango. This wonderful dessert is inspired by Boboko Indonesian Cafe, located in Downtown Harrisonburg. They’re a tough act to follow, but we hope you’ll enjoy this recipe and try something new this year.

Ingredients:

Shop for ingredients from home on our Co-Go website!

1 cup uncooked short grain white rice
1/2 cup water
1 can of full-fat coconut milk
3 T brown sugar
2 ripe mangos

Instructions:
Soak your rice in water for at least 1 hour before you begin cooking.

When your rice is done soaking, drain it from the water and add it to a medium saucepan.

Add your cup of water, coconut milk, sugar and salt into the saucepan.

Bring it to a boil and then reduce the heat to medium-low. Cover with a lid and let it simmer for
15-20 minutes. Stir once or twice to keep rice from sticking to the bottom of the saucepan.

Your coconut sticky rice is ready when it’s soft and chewy, but there is still a little bit of liquid left
to give it a texture similar to rice pudding.

Allow it to cool and enjoy it warm, or refrigerate it before serving. Top with chopped or sliced mango and enjoy!

Note: To get as much fruit from the mango as possible, start by slicing off the sides of the
mango instead of cutting it in half. Then cut cubes or slices from the part of the mango you cut
off, while still keeping it attached to the skin. Then flip the skin towards you and peel off the
mango pieces you’ve cut. I’ve found this way to be much easier than cutting it in half, and you
get more out of your mango using this method.

Potato Leek Soup

There’s nothing like settling in with a hot bowl of soup to warm you up during the coldest time of the year. This wonderfully savory and smooth potato leek soup will certainly do the trick, plus it’s vegetarian and can be made vegan. We hope you enjoy this comforting soup during the cold months ahead.

Ingredients:

2 lbs. yukon gold potatoes

6 cups vegetable broth 

4 leeks 

3 garlic cloves

1 tsp salt

½ tsp dried thyme

¼ tsp black pepper

½ cup plain greek yogurt (optional)


Instructions:

Begin by preparing your vegetables. Chop and clean your leek. You can do this by chopping your leek in half lengthwise, stopping where the fronds start emerging from the stalk. Turn the leek over on its side by 90 degrees and chop again, cutting it into 4 segments. Fan out the sections on the inside of the leek, using the fronds as a handle. Wash out any dirt inside the leek. Press the sections back together and chop finely. Set aside. 

Wash and peel your potatoes. Chop them into chunks and set aside. 

In a large stockpot, add your oil and leeks. Cook them for about 10 minutes, stirring occasionally to cook them evenly. Add your garlic, thyme, salt, and pepper and cook for another 5 minutes. 

Pour in your vegetable broth and potatoes. Bring the pot to a boil, then reduce the heat to medium and cover with a lid. Let it simmer for 30-40 minutes, stirring occasionally to keep things from sticking to the bottom of the pot. 

Once your soup has finished simmering, remove from heat and allow it to cool 10-15 minutes. 

Using an immersion blender, food processor or a regular blender, blend the soup until smooth.

Note: You may have to do this in batches depending on the size of your blender or food processor. If you are using a blender, I recommend waiting until the soup has completely cooled before blending, as the pressure of a hot liquid in a sealed blender can be dangerous and cause your blender to leak or possibly explode. You can then reheat the soup in the pot before serving. 

Stir in your yogurt, if using, and serve. Enjoy!


Lindsay’s Carrot Cake Recipe

We’re dedicating this wonderful recipe to an equally wonderful person, Lindsay! She has been
with the Co-op for 7 years as our Brand Manager and she’ll be retiring this December. We’ll
miss her dearly, but we’re excited that we get to see her off into a new chapter of life.
For any big event, a cake is certainly required, and we’ve cooked up a delicious recipe with
some of Lindsay’s favorite flavors. This carrot cake is topped and coated with a white chocolate
cream cheese frosting that perfectly balances the sweet spiciness of the carrot cake
underneath. It’s perfect to enjoy at upcoming holiday celebrations or any gathering where cakes
can be found.

Ingredients:
2 ½ cups flour
1 ½ tsp ground cinnamon
½ tsp ground nutmeg
½ tsp ground cloves
¼ tsp ground allspice
1 tsp baking soda
1 cup melted butter
2 cups sugar
1 T vanilla extract
4 large eggs
3 cups peeled and grated carrots
1 cup chopped and roasted pecans

For the frosting:
12 oz cream cheese, softened
8 oz of white chocolate
½ cup unsalted butter, softened
½ tsp vanilla extract
½ cup powdered sugar

Instructions:
Preheat your oven to 350°F.

Set your cream cheese and butter on the kitchen counter to reach room temperature before
making your frosting.

Prepare three 9-inch cake pans by greasing them with butter or cooking spray. Cut out 3 pieces
of parchment paper to fit in the bottom of the pan and press it. Set your pans aside.
Note: If you don’t have enough cake pans, you can also bake the remaining cake batter in
muffin tins at a shorter baking time.

If you’re using un-chopped and unroasted pecans, chop them into medium chunks and prepare
a baking tray with parchment paper. Toast the pecans in the oven as it’s warming up, about 10
minutes or until your kitchen begins to fill with the smell of roasted pecans. Check on them
every few minutes to make sure they aren’t burning. Set them aside to cool while you prepare
your carrots.

Wash and peel your carrots. Grate them and set them aside. I recommend grating them directly
into the measuring cup, as it’s difficult to predict how many carrots you’ll need. Set them aside.

Melt your butter over the stove in a small saucepan. Allow it to cool while you prepare your dry
ingredients.

In a medium bowl, add your flour, cinnamon, nutmeg, cloves, allspice, and baking soda. Whisk
them together and set aside.

Transfer your melted and slightly cooled butter to a large mixing bowl. Add your sugar and
vanilla extract, whisking until there are no dry spots of sugar.

Add your eggs to the large mixing bowl one at a time, beating in each one to incorporate.

After adding all your eggs, stir in your pecans and carrots until combined.

Slowly fold in your dry ingredients a few cups at a time until the batter is formed, avoid
overmixing.

Pour your cake batter into your prepared pans. Bake for 35-40 minutes or until a knife inserted
in the cake comes out clean. If baking cupcakes, bake for about 20-25 minutes. Set aside to
cool completely while you make the frosting.

Using the microwave or a double-boiler method, melt your white chocolate. To use the double-
boiler method, you will need a saucepan or pot and a mixing bowl that sits on top of it
comfortably. Fill the saucepan or pot with water about halfway and heat it until boiling. Place a
metal mixing bowl on top of the saucepan and add the white chocolate.

Allow your white chocolate to cool slightly, about to where you could stick your finger in it and
not get burned. This will prevent the butter from melting too much when you add it to the
frosting.

In a medium bowl, add your room temperature cream cheese, room temperature butter and
vanilla extract. Beat with a hand mixer until combined.

Add your melted and cooled white chocolate and mix until combined.

Time to assemble your cake. Between each layer, I recommend adding about 2 heaping spoons
of frosting. Spread each layer evenly and smooth out the top of the cake. Use the remaining
frosting for the sides, or leave it unfrosted. You can decorate it with some pecans placed around
the cake, or leave it plain. Enjoy!

Peanut Butter Cream Pie

Looking to expand your Thanksgiving pie repertoire beyond the traditional pumpkin, pecan and sweet potato? Give this delicious peanut butter cream pie recipe a try, and it’s sure to make its way into your holiday dessert rotation. It’s a Thanksgiving staple for my partner’s family and I look forward to it every year! Creamy peanut butter pudding, whipped cream and crunchy graham crackers crust come together to create a scrumptious no-bake pie. We hope you enjoy this perfectly peanut-buttery recipe.

Ingredients:

1 package of vanilla pudding mix
2 cups of milk (whole or 2% work best)
1 egg
½ cup unsalted peanut butter

Crust:

2 packages of graham crackers
12 T butter
½ cup honey

Toppings:

1 cup heavy whipping cream
1 T powdered sugar
½ cup powdered sugar
3 T peanut butter

Instructions:

First, prepare your pie crust.

Crush your graham crackers until there are no large chunks. You can do this using a food processor, or by hand using a sealable bag and smacking them with a heavy spoon.

Pour your crushed graham crackers in a large bowl and add your honey.

Melt your butter and pour it into the bowl, mixing well until the ingredients are combined.

Transfer your pie crust into an 8- or 9-inch pie pan, or a springform pan of a similar size. Press the dough into the sides and center of the pan at an even thickness.

Put the pie crust in the refrigerator to set.

While your crust is setting, you can prepare the pie filling.

In a medium sized pot, add your milk, pudding mix and egg. Set it on medium heat and stir constantly. When the pudding has begun to bubble and thicken, take it off the heat and continue to stir.

Transfer your pudding into the pie crust and smooth out the surface to create an even layer.

Next, you can prepare your toppings.

In a large mixing bowl, add your heavy cream and 1 T of powdered sugar. Whip your cream with a hand mixer until stiff peaks form. Set aside in the refrigerator.

In a small mixing bowl, add your peanut butter and ½ cup powdered sugar. Mix well with a fork until small clumps begin to form and the powdered sugar is fully incorporated.
With your toppings done, you can assemble your pie. Dollop your whipped cream on top of your pie and smooth it into an even layer, then sprinkle your peanut butter crumbles all over the top.

Put your pie in the refrigerator to set and chill completely for 1-2 hours before serving. Enjoy!

Vegan Cheese Ball

Making an appetizer that pleases everyone can be quite the feat, but this vegan cheese ball is up for the challenge. This creamy and savory recipe can be paired with crackers or vegetables to fend off your hungry guests until dinner is ready. This cheese ball is vegan and packed with flavor so everyone can enjoy every bite. We hope you enjoy this retro recipe.

Ingredients:

8 oz vegan cream cheese
1 cup vegan cheddar cheese, shredded
1 green onion
2 tsp vegan Worcestershire sauce
½ tsp dried parsley flakes
½ tsp dried garlic powder
½ tsp dried oregano
⅙ tsp black pepper (a pinch)

Coating:

½ cup vegan cheddar cheese, shredded

Instructions:

Take your vegan cream cheese out of the refrigerator to soften 5 to 10 minutes before you begin making your cheese ball.

In a large bowl, add your vegan cream cheese and beat it with a hand mixer until smooth. You can also smooth it with a heavy wooden or metal spoon, which will take a little longer. Set aside.

Chop your green onions and add them to the cream cheese.

Add your shredded vegan cheddar to the bowl along with your vegan Worcestershire sauce, parsley flakes, garlic powder, oregano and black pepper. Stir until the ingredients are evenly combined and there are no clumps of unincorporated vegan cream cheese.

With clean hands, form the cream cheese into a ball.

Using either beeswax wrap, a cheesecloth, or plastic cling film, tightly wrap the cheese ball to help it keep its shape. Set it in the refrigerator for at least one hour to chill.

After it’s chilled and set in its shape, remove the wrapping and pat on the remaining vegan cheddar shreds to coat the cheeseball.

Serve immediately with crackers or celery sticks or save it in the refrigerator for up to one week. Enjoy!

Vegan Cereal Treats

Cereal treats are a classic homemade confection that always remind me of cozy fall evenings. They’re perfect to make for a crowd and are always a hit. Our vegan version is simple and quick, but still has all the marshmallow-y goodness you crave. While the standard cereal treat is made with plain puffed rice cereal, your options for deliciousness are unlimited when you think outside the cereal box. Mix things up according to what you or your guest’s like best; try chocolaty rice cereal, fruity rice cereal, or whatever combination you think sounds tasty. We hope you enjoy this recipe.

Ingredients:

5 cups rice cereal (or cereal of your choice)

1 (10 oz) package of vegan marshmallows

4 T non-dairy butter

Instructions:

Grease an 8×8 pan or 9×9 pan with cooking spray or non-dairy butter and set aside.

In a large pot, add your butter and set to medium-low heat. Stir the butter frequently until melted to prevent it from burning.

On medium heat, add your marshmallows. I recommend using miniature marshmallows because they will melt faster than full-sized, but you can use what you have on hand.

Constantly stir the marshmallows and make sure that there are very few blobs of unmelted marshmallow in the pot.

Once your marshmallows have melted, add your rice cereal in. I recommend adding 3 cups of cereal first and folding them into the marshmallows until some of them have stuck together. Then add the rest of the cereal and mix until the marshmallows and cereal are fully incorporated.

Transfer your cereal treats to your prepared baking pan.

Spray some cooking spray or rub some non-dairy butter on your hands. This will prevent the marshmallow from sticking to your hands in the next step.

Gently press the cereal treats into the pan, making them an even thickness and filling in all the sides of the pan.

Allow the treats to cool for 10 to 15 minutes before cutting them into pieces.

Serve and enjoy! To keep them fresh, put them in an airtight container. The cereal will become stale very quickly and your treats will lose their crunch.