Angel Food Cake

This fluffy and delightfully sweet cake is a classic favorite. Angel food cake is wonderful all on its own or served with fruit and whipped cream, and this recipe makes plenty to go around for everyone. This cake has a reputation of being an intimidating bake, but we’ve made it easy to whip up at home with some tips and tricks. I hope you enjoy this scrumptious cake!

Make sure your egg whites are room temperature to get the best rise in your cake. Room temperature egg whites will whip up better than cold ones, which is important. There are no other leaveners, or ingredients to make this cake rise, besides the egg whites.

It is very important not to grease the pan you’re using for this cake. The batter must stick to the walls of the pan to help it rise and keep it from falling out of the pan in it’s cooling phase. You are also asked to turn the cake upside down while cooling. This will keep the cake from collapsing on itself and help it keep it’s rise while cooling.

This recipe will fill a tube pan, which is traditional for making angel food cake. It will also fill 2 loaf pans. Any pan you use must have tall walls to ensure that the cake can cool upside down. You can halve this recipe to fill one 1 loaf pan.

Ingredients:

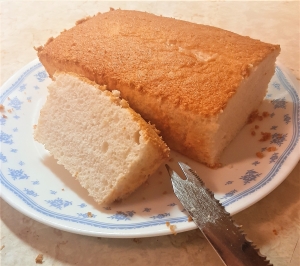
1 Cup cake flour (see instructions below if you do not have cake flour)
1 ¼ Cup of sugar
¼ tsp salt
12 large egg whites
2 tsp vanilla extract
1 tsp cream of tarter

Instructions:

Preheat your oven to 350°

Separate your egg yolks from your egg whites, placing the egg whites and a large bowl. Set the egg whites aside to reach room temperature.

If you do not have cake flour, read these instructions to make your own. Take 1 Cup of all purpose flour and remove 2 T from the flour. Add 2 T cornstarch. Sift the flour and cornstarch together three times. This will serve as your cake flour for this recipe.

Sift your cake flour together with your sugar and salt into a medium sized bowl. Sift the dry mixture one more time to ensure it is fluffy and fine.

Using a hand mixer or stand mixer with a whisk attachment, beat your egg whites until they are foamy, about 1 minute.

Add your cream of tarter and beat the egg whites until soft peaks form, about 2 minutes. If your egg whites are not forming soft peaks after 2 minutes, add another 1/8 tsp cream of tarter to help the peaks form.

Add your vanilla extract and beat until combined.

In 3 separate batches, slowly sift in your dry ingredients. Fold the dry ingredients into the egg whites carefully to avoid losing volume. Fold the mixture until you no longer see large streaks or patches of the dry ingredients in the egg whites.

Pour your batter into an ungreased pan and immediately place it in the oven. Bake for 35-40 minutes, or until the top is lightly brown and a toothpick inserted in the cake comes out clean.

Flip your cake upside down on a cooling rack and allow it to cool at room temperature for 1 hour.

To remove your cake from it’s pan, run along the sides of the pan with a butterknife. For pans without a removable bottom, lay the pan on its side and insert the butterknife into the side of the pan. Gently pull it towards you using the cake on the bottom of the pan with the knife. Alternate sides until the cake pulls away from the bottom and out of the pan.
Serve plain or with a side of fruit and whipped cream. Enjoy!

Southern Style Corn Muffins

The chill of winter has gotten many of us whipping up more soups and stews. Our Deli at the Co-op has even caught soup-fever! These corn muffins pair perfectly with any chili or chowder you make and are perfect for dipping or serving on the side while they’re still warm. This recipe makes a southern-style corn muffin and is savory compared to other sweeter corn muffins. You can make these muffins to pair with your soups rather than a slice of bread or a roll and really let their flavor shine. I hope you enjoy these on a chilly winter’s night.

This recipe makes 12 corn muffins. If you would like to make them vegan, you can substitute the milk for your choice of plant milk and use vegan butter or oil. If you’d like to make these muffins gluten free, you can substitute the flour for your favorite gluten free flour.


Ingredients:

1 ¼ Cups all-purpose flour
1 ¼ Cups yellow cornmeal
1 Cup milk
5 T melted butter (or ⅓ Cups of oil)
2 T granulated sugar
1 T baking powder
1 tsp. salt


Instructions:

Preheat your oven to 400℉.

Grease your muffin tin or tins or line them with muffin liners. Set the muffin tin aside.

In a large bowl, add your flour, cornmeal, baking powder, salt and sugar. Stir to combine.

Add your milk and melted butter or oil. Stir for about 3-4 minutes until it is combined.

Using a spoon, pour the batter into your prepared muffin tins, putting equal amounts in each tin.

Place the muffins in the oven and bake for 20-25 minutes or until a fork inserted into the center of the muffin comes out clean.

Remove the muffins from the oven. Wait 10-15 minutes for them to cool before serving. Enjoy!

Eggnog Pancakes

This eggnog pancake recipe dresses up a well-loved dish for the holiday season. The spices and sweetness from the eggnog infuse the pancakes and make them absolutely delicious and wonderfully fluffy. Serve them at breakfast or even as a festive breakfast-for-dinner along with your favorite breakfast sides. Top them with your favorite pancake dressings like maple syrup and honey or enjoy them plain. These pancakes are sure to please and I hope you enjoy!

For this recipe, we used local dairy eggnog. If you’d like to make these pancakes dairy free, you can use whatever eggnog you prefer for an exact substitute. If you’re vegan, you can substitute the eggs in this recipe with your favorite egg replacement. 


Ingredients

1 Cup all purpose flour
2 Tsp baking powder
⅛ tsp salt
1 Cup eggnog
2 T water
1 Egg
¼ Tsp vanilla extract


Instructions:

In a large mixing bowl, add your flour, salt, and baking powder. Mix to combine.

Add your eggnog, water, egg, and vanilla extract to the bowl and mix to combine. Be careful not to over mix, but make sure that few lumps are visible in the batter. 

If the batter is still very thick and not pourable, add another tablespoon of water.

In a large pan on medium heat, pour the batter to make your pancakes. You can make them whatever size you would like. We recommend using about ¼ cup for each pancake to make about 8 servings of 4×4 inch pancakes. 

Wait until air bubbles have formed at the top of each pancake and the edges appear set before flipping for the first time. Cook the pancakes to your desired crispiness on each side. Repeat until no batter is left.

Serve with your favorite toppings such as honey, maple syrup, butter and whipped cream or alongside your favorite breakfast sides. Enjoy!


Garlic Bread Grilled Cheese

A grilled cheese is the perfect fall heartwarming food for lunch or dinner. This grilled cheese is inspired by another famous comfort food, garlic bread! With just a few pantry staples you can turn your grilled cheese into a savory flavor bomb in a flash. It’s great served alongside a hearty tomato soup or a fresh Italian-style salad.

For our grilled cheeses, we opted for whole-wheat bread, but you can use whatever bread you’d like. You can also make these grilled cheeses vegan or dairy free by substituting ingredients. We have some great options for vegan butter, mozzarella and parmesan in stock at the Co-Op. I hope you enjoy this inventive recipe!


Ingredients:

1 T unsalted room temperature butter
1 T minced garlic
2 slices bread
¼ Cup shredded mozzarella cheese
2 T parmesan cheese

Optional:

1 Tsp oregano


Instructions:

Spread your butter on one side of each bread slice.

Rub a pinch of parmesan cheese onto each buttered side of the bread, reserving the rest for later.

On the unbuttered sides of the bread, rub in your minced garlic.

Put a small pan on medium-low heat. Place one slice of bread in the pan on its buttered side and add your mozzarella cheese. Sprinkle your remaining parmesan on top.

Place the second slice of bread on top, buttered side up.

Cover the pan and allow it to cook for 2-3 minutes. Remove the cover and flip. Repeat this process until the bread reaches your desired crispness and the cheese has melted.

Remove the grilled cheese and sprinkle with oregano before serving if desired. Enjoy!


Halloween Peanut Butter Cups

These peanut butter cups are the perfect Halloween candy to make at home! We use a combination of milk and white chocolate to make these adorably spooky bats and ghosts. They’re perfect as a fun activity for the whole family to make and enjoy once the chocolate has set, along with their gooey peanut butter filling.

To make this recipe vegan, you can change out the milk chocolate for dark, or use your favorite dairy-free milk chocolate brand. White chocolate may contain milk products as well, so feel free to substitute for dairy-free substitutes such as Pascha™ White Baking Chips, which the co-op carries in the baking aisle. If you’d prefer to use natural sugars in your peanut butter cups, you can substitute 3-4 soaked dates for the powdered sugar and blend the dates and peanut butter together. If you or someone you’re serving has a peanut allergy, any nut butter would be a perfect replacement in this recipe.

Additionally, a 12 ounce bag of chocolate chips contains about 2 cups. If you’d like to make the exact amount the recipe states, two 12 ounce bags of chocolate will do the trick. This recipe also recommends that you use miniature muffin liners and tin to assemble your peanut butter cups in. You may use a miniature muffin tin without the liners, so long as you grease your tin very well to ensure the cups will not stick to the tin. We recommend using butter, coconut oil or nonstick cooking spray. You will also need 2 bags that you can cut to create a piping bag for the chocolate. This could be a pastry bag or plastic bag with a small cut in the corner, although you may use a spoon and the tines of a fork if you trust that your hand is steady.


Ingredients:

2 cups milk chocolate chips
2 cups white chocolate chips
½ cup peanut butter
3 T powdered sugar


Instructions:

Line 2 miniature muffin tins with miniature muffin lines. Set it aside.

Line a small plate with parchment paper and set aside.

In a medium bowl, add your peanut butter and powdered sugar. Stir until combined and set it aside.

In a medium bowl, melt all of your white chocolate chips. If you are using a microwave, set the microwave for ½ power and set the timer for 1 minute. Remove the chocolate from the microwave and stir. Microwaving it again at ½ power for one minute.

Transfer your melted chocolate into a piping bag.

Pipe a layer of chocolate to cover the bottom of each liner in one mini muffin tin.

Add about a tablespoon of peanut butter filling into each liner.

Pipe a second layer of chocolate into each liner to cover the peanut butter, filling it to the top. Place the tin in the refrigerator to begin setting.

In a second medium bowl melt 1 ½ cups of your milk chocolate chips. If you are using a microwave, set the microwave for ½ power and set the timer for 1 minute. Remove the chocolate from the microwave and stir. Microwaving it again at ½ power for one minute.

Transfer your melted chocolate into a piping bag.

Pipe a layer of chocolate to cover the bottom of each liner in one mini muffin tin.

Add about a tablespoon of peanut butter filling into each liner.

Pipe a second layer of chocolate into each liner to cover the peanut butter, filling it to the top. Place the tin in the refrigerator to begin setting.

Using the same bowl as your milk chocolate, melt the remainder of your milk chocolate for 1 minute on ½ power in your microwave. Add the melted chocolate to your piping bag.

Remove the white chocolate peanut butter cups from the refrigerator and pipe small dots on them to create a spooky face, like shown in the photo. When complete, put them back into the refrigerator to set.

Using the remaining milk chocolate, pipe wing shapes onto your parchment lined plate. Put them in the refrigerator to set.

Allow all of the chocolates to set in the refrigerator for 2 hours.

To serve, remove the peanut butter cups from the mini muffin tins. Carefully remove the bat wings from the parchment paper. If there are exposed spots of peanut butter filling, you may stick the bat wings into the sides of the cup. If not, place them underneath the cup to give the illusion of wings.

Enjoy these spooky treats!


Kabocha Squash (Japanese Pumpkin) Bread

This sweet bread is a great treat as the weather gets colder, with warm and comforting spices that are perfect for a fall day. Instead of using a regular American pumpkin, this loaf uses kabocha squash to make it moist and flavorful. Kabocha squash is also known as Japanese pumpkin, its flavor is somewhere between a pumpkin and a butternut squash and it’s texture is wonderful for baking. Enjoy this bread fresh out of the oven or toasted with some butter the next morning.

If kabocha isn’t in season when you make this recipe, you can substitute with pumpkin puree for a similar flavor. This recipe can also be made vegan very easily by using vegan butter and “flax eggs.” To make a flax egg, grind 1 T of flax seed with 3 T of water and set it in your refrigerator for 15 minutes before adding it in the place of eggs. I made a vegan version of this sweet bread for our Front End team meeting and it was a hit!


Ingredients:

2 Cups all purpose flour
½ Tsp salt
1 Tsp baking soda
½ Tsp baking powder
1 Tsp ground cloves
1 Tsp ground cinnamon
1 Tsp ground nutmeg
2 Cups brown sugar
2 eggs
⅔  Cup unsalted butter
2 Cups kabocha puree


To make kabocha puree:

Peel a small kabocha squash.
Cut the kabocha in half and scoop out it’s seeds, then chop it into large cubes.
In a large pot, add the kabocha cubes to boiling water. Boil for 20 minutes.
Remove the pot from heat. Using a colander, strain the kabocha from the boiling water.
Transfer the kabocha to a food processor or blender until it is smooth to form the puree.
Drain any excess water from the puree using a cheesecloth or a fine mesh strainer.
Set the puree aside until you are ready to bake.


To bake the bread:

Preheat your oven to 375℉
In a large bowl, combine your flour, spices, salt, baking powder and baking soda. Whisk them together and set it aside.
In a separate smaller bowl, add your butter and sugar. Cream them together by beating them with a whisk until combined.
Add your eggs to the sugar and butter mixture, beating until the mixture becomes fluffy.
Pour your kabocha puree into the mixture and beat it until the mixture is combined.
Add your dry ingredients and fold the wet and dry mixtures together until a thick batter is formed.
Transfer the batter to a 9″ x 5″ loaf pan.
Bake for one hour and 15 minutes or until a toothpick comes out clean.
Serve it warm and fresh out of the oven or the next morning toasted with a little bit of butter. Enjoy!


No-Bake Granola Bar Treats

These granola treats are my favorite snack to enjoy on a Saturday afternoon. With protein from peanut butter and sweetness from chocolate and honey, they’re filling and sure to satisfy.

This recipe calls for peanut butter, but any nut butter works perfectly in this recipe. Don’t hesitate to use whatever nut butter you have on hand, or what you like best. For those using chocolate in this recipe, make sure to add your chocolate after the granola has cooled slightly so it won’t melt. However, if you’d like the batch to be extra chocolaty, feel free to mix it in while the granola is still warm.

The base of this recipe serves as a blank canvas for all kinds of granola bar creations. I have a pretty persistent sweet tooth, so I enjoy making these with sweet additions like chocolate. You can add any kind of nuts, seeds or dried fruits you have on hand and omit the chocolate to make these bars even more nutritious.

Ingredients:

¾ cup peanut butter
½ cup honey
2 T sunflower oil (or any neutral-flavored oil)
1 Tsp vanilla extract
½ Tsp sea salt
2 ¼ cups old fashioned oats
¼ cup milk chocolate chips
¼ cup white chocolate chips

Variations:
½ cup chopped nuts
½ cup dried fruit
½ cup dried shaved coconut
½ cup pumpkin seeds
½ cup chia seeds

Instructions:

Line an 8x8inch pan baking pan with parchment paper. Set it aside.
In a saucepan over medium heat, add your peanut butter, oil and honey. Simmer it until it begins to bubble slightly, stirring occasionally. This may take 7 to 10 minutes.
Add your vanilla extract and salt. Stir the mixture to incorporate it and allow it to simmer for one more minute.
Add your oats and stir until combined, allowing the oats to fully absorb the mixture.
Place your granola to the refrigerator for 10 to 15 minutes, allowing it to cool slightly. Remove it and stir in the chocolate chips until fully incorporated.
Transfer the granola to your baking pan and press it into the pan. Packing the granola down firmly and evenly will help it keep its shape once prepared.
Allow the granola to chill in the refrigerator for 1 to 2 hours.
Once cooled, lift the granola out of the pan using the parchment paper. Cut them into your desired shape and enjoy!

Banana Yogurt Smoothie Bowl

This smoothie bowl is great for any breakfast, or even as a midnight snack. With added protein from greek yogurt and peanut butter, it’s sure to keep you full all morning while satisfying your sweet tooth.

This recipe serves as a base for a smoothie bowl. You can add your favorite toppings and come up with all kinds of great flavor combinations. If you have a peanut allergy, any type of nut butter works great in this smoothie bowl. For vegans or those with milk allergies, any type of thick vegan yogurt can be substituted in this recipe as well. Almond milk is added to ensure that the smoothie has enough liquid to blend properly, but you can substitute with any milk of your choice.

This recipe also makes great “nice cream,” a popular name for ice cream made with bananas. To make this recipe into nice cream, you can double or triple the ingredients and pour it into a loaf pan to place in your freezer to enjoy later.


Ingredients:

½ cup unsweetened greek yogurt
1 frozen banana
2 T peanut butter
¼ cup almond milk

Optional:
Granola
Chopped nuts
Sliced fruit
Seeds
Chopped coconut
Nut butter
Cereal
Chocolate
Honey

Instructions:

Add your almond milk, frozen banana, greek yogurt and peanut butter to a blender or food processor.

Blend until the mixture is smooth and fully incorporated.

Spoon into a bowl and top with your desired toppings. Enjoy!


Chilled Cucumber and Yogurt Soup

With the arrival of summer’s hot weather, you might be getting creative with different ways to cool off. Try out this chilled cucumber soup, made with greek yogurt. It’s a refreshing, creamy, tangy dish you can enjoy on a particularly warm afternoon or evening. Serve it as an appetizer or a palette cleanser along with your favorite grill fare – or, enjoy it on it’s own!

This recipe calls for greek yogurt. For vegans or those who are lactose intolerant, any type of unsweetened greek-style or thick yogurt will work great in this recipe.


Ingredients:

1 large cucumber
1 cup unsweetened greek yogurt
1 shallot
1 clove garlic
1 T fresh or dried dill weed
1 T lime juice
½ tsp salt or to taste


Optional garnishes:

A sprinkle of dill weed
A dollop of yogurt
Thinly sliced cucumbers


Instructions:

Dice your shallot and garlic clove. Set them aside.

Peel your cumber and remove the seeds. Chop into medium-sized chunks and set aside.

In a blender or food processor, add the diced shallots and garlic. Add your cucumber, greek yogurt, dill weed, lime juice and salt.

Blend the soup until it is smooth.

Transfer the soup into the fridge, in an airtight container and allow it to cool for 30 minute to an hour. Serve and enjoy!

2-Ingredient Chocolate Truffles

This recipe comes from one of our front-end team members, Delaney. She loves creating affordable, plant-based meals for herself and is excited to share her creations for you to enjoy!

If you have a craving for rich chocolate, this is a must-try recipe. You only need 2 ingredients, your microwave and one bowl. No mess, no fuss and lots of yummy chocolate truffles. You can even customize them and coat them with whatever toppings you’d like. I used some sprinkles I had in my cabinet, along with some powdered sugar and cocoa powder to coat these. I’ve put some suggestions for coatings along with the recipe, but feel free to get creative with them!

This recipe calls for coconut cream, but heavy cream also works to make the chocolate ganache base for these truffles. I recommend using chocolate that’s between semi-sweet or 70% dark to achieve the right texture and firmness for these truffles. You can store them in the refrigerator in an airtight container if you want to save some for later. They’ll stay fresh for 1 week, or up to 2 months if stored in the freezer.

Ingredients:

¼ cup of coconut cream (find it on the baking aisle)
1 cup of semi-sweet or dark chocolate chips
½ Tsp vanilla extract (optional)

Extras for Coating:
Cocoa Powder
Sprinkles
Powdered Sugar
Cinnamon Sugar
Chopped Nuts

Directions:

Scoop the coconut cream into a microwave safe bowl. Microwave the coconut cream on high for 1 to 2 minutes, or until it begins to boil. This will depend on the strength of your microwave, so keep an eye on your cream and adjust the time as needed.
Remove the bowl from the microwave and pour chocolate chips into the cream. Do not stir. Cover the bowl with a kitchen towel for 5 minutes. This will allow the chocolate to melt and easily incorporate into the cream.
After 5 minutes, stir until the chocolate is incorporated with the cream and no chocolate lumps are visible.
Allow the ganache to chill in the refrigerator for 1 to 2 hours. Don’t cover the ganache while it’s warm, as covering it will form condensation that can cause it to split.
Once chilled, use a small scoop or a spoon to roll the ganache into balls.
Coat the balls in your desired toppings or enjoy them plain!