Simple Dinner Rolls

These dinner rolls are based on a tried-and-true bread recipe giving to us by our friend in the Produce Department. While it might seem too good to be true, it’s delicious and we make it nearly every week. It’s so darn easy to make because doesn’t require kneading, and you’ll have fresh bread in no time. From our kitchen to yours, we hope you enjoy this easy recipe.


Ingredients:

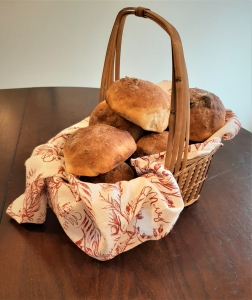
1 T active dry yeast
1 T sugar
1 T salt
1/4 th cup olive oil
2 ¾ cup lukewarm water
6 ½ cup flour
Extra olive oil to grease the baking sheet
Extra flour for shaping the dough


Instructions:

Preheat your oven to 450°.

Prepare 2 baking sheets by smearing them with a light coating of olive oil. Set aside.

In a large bowl, add your water, yeast, and olive oil.

Let the mixture sit for 1-2 minutes, then add your salt.

Add your flour to the bowl and mix carefully, until the dough is just combined.

Take note that this dough doesn’t require kneading and it will have a better texture when it isn’t handled very much.

This dough will be very wet, even when combined. Only use your hands to mix the dough when it is mostly combined to eliminate dry spots in the dough.

Cover the dough with a cloth and allow it to sit for 2 hours to rise. You can place it in the refrigerator after it’s risen for up to 1 week.

Once your dough has risen, you can begin shaping it.

Add a pinch of flour to your hands. Take a portion of dough out of your dough ball that’s about the size of a tennis ball. Gently roll it around in your hands to shape it into a ball.

Flour a clean surface and place your dough ball on it. Cup your hands around the dough ball. Tuck the bottom of the dough ball in by pinching it between your hands and sliding around all sides. Do this action two or three times, until the dough ball is round and smooth.

Once you’ve finished, place your dough ball on your prepared pan and repeat. This recipe will make 16 tennis ball sized rolls, but amounts may vary depending on how big you make your dough balls.

Bake for 27 minutes or until they are dark golden brown on top. This dough is very wet, so I recommend cooking it for the full time given to make sure it’s fully cooked. It’s also hard to burn this recipe for the same reason, so you may bake it a little longer and it will still come out well.

Allow them to cool for 10-30 minutes before serving and enjoy!


Lemon Cream Pie

We’re mixing things up this Thanksgiving with a new take on a classic pie. Lemon cream pie isn’t the typical fall dessert, but this recipe is a showstopper and is perfect for festive occasions. Its tartness is perfectly balanced by the sweet creamy filling, while the crust provides a satisfying crunch. We hope you enjoy this delicious recipe!

This recipe can be made vegan using vegan graham crackers, vegan butter, maple syrup, sweetened condensed coconut milk and non-dairy whipped topping. We have all these ingredients available for purchase at the Co-op.


Ingredients:

Crust:
2 packages of graham crackers
12 T butter
½ cup honey


Filling:

1 can sweetened condensed milk
½ cup fresh lemon juice
2 Tsp lemon zest
2 cups heavy cream


Topping:

Lemon Slices
1/2 cup heavy cream
½ Tsp cornstarch


Instructions:

Find the pan you’d like to use for this recipe and set it aside. This recipe makes a lot of filling, which requires you to use a dish with tall sides to hold it in. I recommend using an 8-inch pie pan with tall sides, about 2 to 3 inches tall. You can also use an 8-inch springform pan, which is what I used for this pie. Alternatively, you can also split this recipe into 2 pies in a standard-height pie pan. Just be mindful of the size of your pan.

Crush your graham crackers until they are the texture of coarse sand, with no large chunks of graham cracker left.

Melt your butter in a small saucepan or in a small bowl in the microwave.

Add your butter and honey to the ground graham crackers. Stir until fully combined.

Pat your crust into your pan in an even layer, creating a wall of crust along the side. Set your crust aside to make your filling.

Zest your lemons and put your lemon zest into a medium bowl.

Juice your lemons. Measure the juice and add it to your bowl.

Add your sweetened condensed milk to the lemon juice and zest and stir until combined.

In a large bowl, add your heavy cream and whip it on high with a hand mixer until you reach stiff peaks. Your whipped cream has reached stiff peaks when it stands on its own and makes defined ribbons and peaks as you’re whipping it.

Add your whipped cream to the lemon mixture. Gently fold the ingredients together until fully combined, careful to avoid deflating the whipped cream.

Spoon your filling into your crust. Make the surface level and smooth using a spatula or spoon.

Allow the filling to set in the refrigerator for at least 4 hours or overnight before decorating.

To decorate your pie, add your heavy cream and cornstarch to a bowl and whip it into stiff peaks. The cornstarch will help the whipped cream keep its shape for a longer period of time. Pipe the whipped cream onto the pie using a piping bag or a sandwich bag with the corner cut off. I recommend going in short puffs around the edge of the pie, as shown in the photo.
Slice your lemons and place them on your pie in the pattern of your choosing.

Your pie is ready to serve. Enjoy!


Southwestern Sweet Potato Salad (Vegan and Gluten Free)

Sweet potatoes are a well-loved staple in fall, particularly at Thanksgiving dinners. We’ve reimagined the classic side dish into a sweet-and-savory salad that is the perfect side dish for any autumn occasion. This dish is also vegan and gluten free, so everyone at the dinner table can enjoy it together.


Ingredients:

2 medium sweet potatoes
1 lime
1 (14 ounce) can of black beans
3 T cilantro
3 T sunflower oil (or neutral oil of your choice)
1 T salt
½ tsp cumin
½ tsp paprika


Instructions:

Bring a large pot of water to a boil.

Wash and peel your sweet potatoes.

Put your sweet potatoes in the boiling water and allow them to cook until tender, about 30 to 40 minutes depending on the size of your potatoes.

While your sweet potatoes are boiling, you can prepare the other ingredients.

Separate your cilantro leaves from the stems. Roughly chop the cilantro leaves and set them in a large mixing bowl.

Drain the liquid from your canned black beans and rinse them in water. Allow the water to drain before you add the black beans into your mixing bowl.

Cut your lime in half and squeeze the juice into the bowl.

Add your oil, cumin, salt and paprika into the bowl and mix.

When your sweet potatoes are cooked, allow them to cool slightly before chopping them into about 1 to 2 inch squares. Add them into your bowl and mix to combine.

Allow the dish to chill in the fridge overnight, or for at least 8 hours before serving. Enjoy!

Glorious Goat Cheese

Last month, we added several new goat cheeses to our cheese island that are downright delicious. You might remember goat cheese as soft and spreadable, also known as chèvre. We have quite a few types of chèvre, but it’s not a perfect substitute for the cheese on your pizza or in your macaroni and cheese.

Our new Mozzarella, Cheddar and Pepper Jack goat cheeses from LaClare Family Creamery® are perfect for any recipe and are incredibly similar to their cow’s milk counterparts. We highly recommend them to anyone who finds goat’s milk to be gentler on their digestive system, or if you’d like to try them out.

If you’re looking to take these goat cheeses for a spin, why not test them out on a pizza? We’ve tried it ourselves and it was simply delicious, not to mention perfectly cheesy. You can use store-bought pizza dough and pizza sauce to make your scrumptious slices, but we also have a from-scratch recipe you can refer to if you’re feeling more adventurous. We hope you enjoy these great new goat cheeses.


Goat Mozzarella Pizza


INGREDIENTS


For the pizza dough:

2 cups flour

1 tsp salt

¾ tsp active dry yeast

1 tsp olive oil

¾ cup lukewarm water

¼ tsp sugar


For the pizza sauce:

6-8 Roma tomatoes

¼ an onion

2 cloves garlic

2 T olive oil

1 T salt (or to taste)

2 T Italian seasoning

¼ cup water


For the topping:

LaClare Family Creamery® Goat Mozzarella cheese

Basil


Instructions:

Pour the yeast into your cup of lukewarm water and add your sugar. Allow it to rest for 5 to 8 minutes, until the yeast has begun to bubble, and it smells strongly of yeast.

While your yeast is blooming, put your flour and salt into a large bowl.

When your yeast has bloomed, add your olive oil, and stir gently to combine.

Pour your yeast mixture into the flour and stir to combine. When your dough begins to come together, you will need to use your hands to mix it.

Once your dough has come together, it’s time to knead it. Place your dough ball on a floured surface and knead it for about 15 to 20 minutes, adding flour as you go to prevent your hands from sticking. Your dough ball will be ready when it bounces back from your touch but no longer sticks to your hands when you touch it or knead it.

When your dough is done, cut it into 2 segments and shape them into tight balls before allowing them to rest.

Your dough now needs to rise. Cover your dough balls with a damp towel in a warm place, but out of direct sunlight. Allow them to sit for at least 1 hour, or until they have roughly doubled in size.

While your dough is rising, you can make your tomato sauce.

Dice your onions. Put them in a large saucepan with your olive oil on medium heat.

Peel and dice your garlic. Add them to the saucepan.

Remove the seeds from your tomatoes and cut them into rough slices. If your onions are translucent and your garlic is fragrant, add your tomatoes to the pan. Add your water to the pan as well.

Add your salt and Italian seasoning to the pan and stir to combine.

Cover your pan and allow it to simmer on medium heat for 10 minutes.

Once it has simmered, use the back of your spoon to crush the tomatoes further. Allow the sauce to simmer for 5 minutes longer uncovered.

While you wait for your dough to rise, you can also prepare your cheese. LaClare Family Creamery® Goat Mozzarella cheese comes as a block, so you will need to grate using a box grater to make it into shreds for your pizza. You can also slice it very thinly with a vegetable peeler and cut it with a sharp knife to create shreds if you don’t have a grater.

When your dough has risen, heat your oven to 500℉ and place a large sheet pan in the oven to act as your pizza stone.

On a large sheet of parchment paper, stretch out your pizza dough to your desired shape. I recommend making it about ½ inch thick all around to prevent it from cooking unevenly.

Spread your sauce on your pizza using a large spoon. It’s ok if you see some spots of dough from beneath the sauce, as this will prevent a soggy pizza.

Using about half of your shredded cheese, sprinkle your cheese on top of the pizza. Make sure to spread it evenly to avoid the cheese pooling in one spot.

Add your fresh basil on the pizza, or any other desired toppings.

Using oven mitts, remove your sheet pan from the oven and place it on a heat-resistant surface.

Transfer your pizza to the sheet pan, keeping it on the parchment paper.

Cook the pizza for 10-12 minutes, or until the cheese has melted and the crust becomes sandy brown in color.

Remove your pizza from the oven onto a heat-resistant surface. Allow it to cool 5 minutes before cutting it using a pizza cutter or knife.

Slide your pizza onto a plate using the parchment paper and enjoy!


Ginger Cookies (Vegan)

We’re ready to welcome the flavors of fall with these ginger cookies. These treats are great to make with family and friends, or as an activity with your kids. They’re also vegan and can easily be made gluten-free, so everyone can enjoy them.


Ingredients:

2 ¼ cups flour
¾ cup neutral oil (canola, sunflower)
1 cup brown sugar
¼ cup molasses
2 tsp baking soda
1 tsp ground ginger
1 tsp ground cinnamon
1 tsp ground cloves
1 tsp vanilla extract
¼ tsp salt
3 T water
1 T flax seed
Demerara sugar for topping


Instructions:

Blend your flax seeds in a blender or food processor. Add your water and allow the mixture to sit in the refrigerator for 15 minutes. This will make a “flax egg” for your recipe.

Preheat your oven to 375°.

Prepare 2 large baking sheets by lining them with parchment paper. Set them aside.

Add your flour, spices, baking soda, and salt into a medium sized bowl. Stir it to combine the ingredients and set aside.

In a large bowl, add your sugar, molasses, oil, flax egg, and vanilla extract. Stir until they are combined.

Add your dry ingredients to your wet ingredients and stir until combined.

Pour some of your demerara sugar in a small bowl.

Form your cookie dough into balls about 1 inch wide and press the top of the cookie into the demerara sugar.

Set your cookies on your prepared baking sheets as you go, about 2 inches apart from each other.

Bake your cookies for 9 minutes and allow them to cool completely before serving. Enjoy!


Greek Chickpea Salad (Vegan)

This chickpea salad is perfect for packing into lunchboxes or to make when it’s just too hot outside to cook. It’s flavorful and packed with nutrients to make you feel full and satisfied. This salad is also vegan, which makes it perfect as a refreshing side dish for dinners and get-togethers.


Ingredients:

1 15 ounce can of chickpeas
1 can or jar of kalamata olives
1 cucumber
½ of a red onion
3 T parsley
2 cloves garlic
3 T olive oil
3 T balsamic vinegar
2 T salt (or to taste)
½ tsp black pepper


Instructions

Drain and rinse your canned chickpeas. Put them in a large mixing bowl and set aside. You will continue to add ingredients to the bowl as you go.

Drain your kalamata olives. Cut them in half lengthwise and add them to your mixing bowl.

Peel your cucumber and remove the seeds. Dice it into small pieces and add it to your bowl.

Dice your red onion. Add it to your bowl.

Mince your parsley and add it to your bowl.

Finely mince your garlic cloves and add them to your bowl.

Add your olive oil, balsamic vinegar, salt, and black pepper to your bowl and mix until well combined.

Chill for 1-2 hours in the refrigerator and serve cold. Enjoy!

PB&J Cookie Bars (Vegan)

The classic peanut butter and jelly gets reimagined for dessert. These cookie bars are chock-full of rich peanut and sweet fruity flavor, just like your favorite childhood sandwich. These dessert bars can be made vegan for everyone to enjoy and they’re sure to fly right off the plate.


Ingredients:

9 T unsalted butter (vegan or regular)
⅔ cup peanut butter
1 cup brown sugar
1 ¼ cup granulated sugar
1 tsp vanilla extract
1 ½ cups flour
½ tsp salt
½ tsp baking powder


For the topping:

4 sheets of graham crackers
1 T butter
1 T peanut butter
1 jar of jelly or jam


Instructions:

Preheat your oven to 350°

Grease an 8×8 or 9×9 pan with butter or line it with parchment paper

Melt your butter in a small pot over medium heat.

When your butter has melted, add the peanut butter, and mix until combined.

Transfer your mixture into a large bowl.

Add your brown sugar, granulated sugar and vanilla extract to the bowl and stir until combined.

In a separate smaller bowl, add your flour, salt, and baking powder. Mix until combined.

Pour your dry ingredients into your wet ingredients and stir until they’ve just come together. Be careful not to overmix.

Pour the batter into your prepared pan and create an even layer of batter with a spatula.

Bake for 25 to 30 minutes, or until the sides become golden brown and a toothpick inserted in the center comes out clean. Allow it to cool for 10-15 minutes before adding any toppings.

While your cookie is baking, you can make the topping.

Heat a tablespoon of butter in a small bowl or saucepan. You can use a microwave or a stovetop.

Crush your graham crackers into crumbs and add them to the bowl.

Add a tablespoon of peanut butter to the bowl.

Stir the ingredients to combine them. This can be done with a fork or spoon, but it’s much easier when done with your hands.

Once your cookie has cooled, you can begin topping it.

Spread an even layer of jelly or jam over the top of the cookie, about ½ an inch thick.

Sprinkle a layer of your graham cracker topping on top of the jam, making sure to cover all the visible jam.

Cut it into squares and enjoy!


Peach Icebox Cake (Vegan)

Refreshing cold desserts are a great relief from the summer heat. This peach icebox cake can help you beat the heat and satisfy your sweet tooth. Using locally grown peaches and just a few ingredients from your pantry, this treat is simple to make and easy for everyone to enjoy.

Ingredients:

8 peaches
1 box vegan graham crackers
1 (15 oz) can of full-fat coconut milk

For the pudding:

Coconut milk + 2 T coconut cream
¼ cup sugar
½ T cornstarch
1 tsp vanilla extract

For the whipped cream:

Coconut cream
¼ cup sugar
1 T vanilla extract
1 tsp cornstarch


Put your can of coconut milk in the refrigerator for 3 to 4 hours before making your icebox cake. This will separate the coconut milk and coconut cream.

Peel, pit and slice your peaches. Set them aside.

Open your can of coconut milk. There will be a distinct layer of coconut cream at the top of the can. Scoop the coconut cream into a separate bowl and pour the coconut milk into a small pot. Take 2 tablespoons of the coconut cream and put it in the coconut milk, stirring to combine.

Set your coconut cream aside in the refrigerator.

Cook your pot of coconut milk over medium heat. Add the sugar, vanilla, and cornstarch to the pot. Whisk it constantly to dissolve the cornstarch and it thickens to pudding consistency. This will take 10-15 minutes.

Remove your coconut cream from the refrigerator to make your coconut whipped cream.

In a medium mixing bowl, add the coconut cream, sugar, vanilla extract, and cornstarch.

Whip the coconut cream using a hand mixer until soft peaks form.

Gather your coconut whipped cream, peaches, pudding, and graham crackers to assemble your cake.

In an 8×8 pan, add a layer of graham crackers to the bottom.

Pour your coconut pudding on top of the graham crackers.

Add a layer of peaches, saving some for the decoration on top.

Place another layer of graham crackers on top of the peaches.

Smooth the coconut cream on top of the graham crackers.

Top the cake with peaches and crumbled graham cracker pieces.

Refrigerate your icebox cake for 2 to 3 hours before serving. Enjoy!


Vegan Sloppy Joes

Sloppy joes remind us of summer cookouts or lazy dinners on the back porch when the heat of the day has faded away. We’ve recreated this classic dish using textured vegetable protein, a vegan protein that’s tasty and affordable, so everyone can have a bite. It comes together in just 20 minutes and goes great on your favorite sandwich bread. I hope you enjoy!

Ingredients:

6 ounces of dry TVP (textured vegetable protein – find it in the grocery aisle)
6 ounces of water
15 ounce can of tomato sauce
1 bell pepper (any color)
½ of a white onion
2 cloves of garlic
1 T olive oil
1 T salt
1 T ground pepper
3 T brown sugar
4 T chili powder
1 ½ T dijon mustard
2 T worcestershire sauce


Instructions:

Measure out 6 ounces of dry TVP and put it in a medium sized bowl.

Measure 6 ounces of boiling water and add it to your TVP. Cover it and set it aside. Your TVP should almost triple in size as it absorbs the water.

Mince your garlic cloves and dice your onions. Dice your bell pepper.

Cook your onions, bell peppers and olive oil in a medium sized pot until the onions are translucent. Add your garlic and cook until fragrant.

Add your tomato sauce, dijon mustard, worcestershire sauce and brown sugar into the pot. Stir over medium heat until combined and allow it to cook for 2-3 minutes while stirring occasionally.

Scoop your TVP into the pot and stir to combine it with your sauce.

Add your salt, pepper and chili powder to the sauce and stir to combine.

Allow the mixture to simmer on medium heat before serving.

When you’re ready to serve, spoon your TVP sloppy joes onto your favorite bun and enjoy!


Watermelon Granita (Vegan)

Beat the summer heat with a refreshing frozen treat you can make yourself. This watermelon ice is easy to whip up and only takes a few ingredients. It’s perfect for a hot day or a July 4th celebration, and wonderful when enjoyed with a sprig of fresh mint.


Ingredients:

4 Cups seedless watermelon

½ Cup sugar

½ Cup water

1 T lemon juice


Optional Toppings: 

Fresh mint leaves


Instructions:

Cut your seedless watermelon into small cubes, removing the rind.

Measure roughly 4 cups of your watermelon cubes.

Put your watermelon cubes in a blender and blend until smooth.

In a small saucepan, bring your water to a boil.

When your water is boiling, lower it to medium-high heat and add your sugar. Stir until your sugar is dissolved. Allow the sugar mixture to cool for 3-5 minutes.

Add the sugar mixture and lemon juice to your blended watermelon and stir to combine.

Pour your watermelon mixture into a large loaf pan. Put it in the freezer to set and cover the top of the pan.

Allow your watermelon granita to set in the freezer for 12 hours or overnight.

When you’re ready to serve your watermelon granita, thaw it at room temperature for 3 minutes. Scrape the top with a large spoon or fork and place the shavings in your desired bowl. Enjoy!


For an alternative preparation, you may pour the watermelon mixture into ice cube molds and freeze them. When you’re ready to serve your watermelon ice, pulse it in the blender 3-4 times until it becomes fluffy shaved ice.