Strawberry-Rhubarb Muffins

Strawberry and rhubarb are natural culinary companions. Sweet and tangy flavors create a delicious harmony that often reminds us of early summer. We hope you enjoy these muffins as much as we do and that they inspire you to create your own summer treats.

Ingredients:

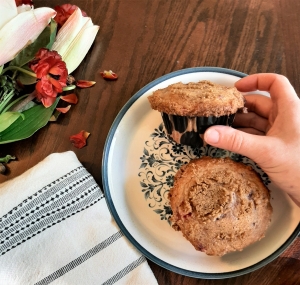
2 cups diced strawberries
2 cups chopped rhubarb
1 cup granulated sugar
8 T unsalted butter, melted
2 eggs (room temperature)
½ cup milk (whole milk recommended)
2 cups all-purpose flour
1 T vanilla extract
2 tsp baking powder
1 tsp salt
¾ tsp baking soda

For the streusel topping:

1 cup brown sugar
½ cup flour
1 ½ tsp cinnamon
4 T unsalted butter

Instructions:

Preheat oven to 400℉.

Line 3 muffin tins with cupcake liners and set them aside.

Wash your rhubarb and cut off the fibrous ends. Depending on the size of your rhubarb, you may want to slice it in half longways before chopping it. Chop the rhubarb into ½ inch thick chunks and set aside in a small bowl.

Wash and dice your strawberries. I recommend dicing the strawberries into pieces slightly smaller than the rhubarb. Put your strawberries in the bowl with the rhubarb.

Add 1 T of granulated sugar to the strawberries and rhubarb. Stir to combine and set the mixture aside.

In a large bowl, add your flour, salt, baking powder, and baking soda. Whisk lightly to combine and set aside.

In a separate bowl, add your melted butter and sugar. Whisk until most of the sugar has dissolved in the butter.

Add your vanilla extract, eggs, and milk to the butter mixture. Whisk until combined.

Using a cheesecloth or a sieve, drain some of the excess moisture from your strawberries and rhubarb. They don’t have to be completely dry before going into the batter, so don’t worry about getting all the moisture out.

Pour your wet ingredients into the dry ingredients and stir until just combined.

Add your drained strawberries and rhubarb to the batter and stir to combine.

Using a spoon, pour the batter into your prepared muffin tins. Fill each one until there’s about ¼ an inch of space left in the cupcake liner. This usually makes a little under 18 muffins.

Set your muffins aside and make your streusel topping.

In a small bowl, add your flour, brown sugar, and cinnamon. Stir to combine.

Cut your butter into small pieces and add to the mixture. Squash the butter into the mixture until it’s completely combined and resembles the texture of damp sand.
Sprinkle the streusel in an even layer on top of each muffin.

Bake for 20-25 minutes, or until they’ve begun to brown on top and a fork inserted in the center comes out clean.

Allow them to cool and enjoy!


Lemon Chicken Orzo Soup

This bright and flavorful soup is perfect for when you’re craving something refreshing, but the chill of early spring hasn’t quite worn off. Flavorful, savory, and nutritious, this soup will be your latest obsession. We hope you enjoy this recipe.

Ingredients:

2 celery sticks, finely chopped
2 medium carrots, peeled and finely chopped
½ medium yellow onion, diced
1 T butter
1 T olive oil
3 cloves minced garlic
2 T all-purpose flour
6 cups chicken broth
1 cup chopped kale
2 tsp Italian seasoning
1 ½ lb. chicken breast or tenderloin
1 cup uncooked orzo pasta
2 lemons, juiced
2 T chopped parsley
Salt and pepper to taste


Instructions:

Peel and finely chop your carrots, dice your onions, and finely chop your celery.

Mince your garlic and set it aside if you are not using pre-minced garlic.

Chop your kale and parsley and set it aside.
In a large soup pot, add your butter and olive oil on medium heat.

Add your carrots, onions and celery to the soup pot and cook them for 5-7 minutes, stirring frequently. Add your garlic and cook until fragrant, about 3-4 minutes.

While stirring, add your all-purpose flour in and cook for another minute.

Pour in your chicken broth and stir until the flour has dissolved.

Add your Italian seasoning, kale and chicken to the soup base and stir.

Cover it with a lid and reduce it to medium-low heat. Allow it to simmer for 15 minutes, stirring occasionally to prevent anything from sticking to the bottom of the pot.

While your chicken is cooking, you can juice your lemons and set the juice aside.

Remove your chicken from the pot and shred or cut it into smaller pieces as desired.

Put your chicken back into the pot and stir in your uncooked orzo pasta.

Cook on medium heat for 10 minutes, stirring constantly to prevent the orzo from sticking to the bottom of the pot.

When your orzo is done cooking, stir in your parsley, lemon juice, salt, and pepper.

Serve and enjoy!

Turkey Chili

Chili is a go-to meal for anyone who’s not sure what to make for dinner. Throw everything into the pot and let it simmer, you can even bake some cornbread to serve alongside it while you wait. Our recipe for turkey chili is easy to make and sure to please, we hope you enjoy it as much as we do.

Ingredients:

2 T olive oil
1 medium yellow onion, chopped
3 garlic cloves, minced
1 large red bell pepper, chopped
2 T all-purpose flour
1 ¼ cups chicken broth
1 lb. white ground turkey
28 oz diced or crushed tomatoes
30 oz pinto or kidney beans
4 T chili powder
2 T cumin
1 tsp dried oregano
1 T paprika
½ T salt (or to taste


Optional Toppings:

Crushed tortilla chips
Sliced avocado
Shredded cheddar
Sour cream

Instructions:

Chop your onion and red bell pepper. Mince your garlic if you are not using pre-minced.

In a large soup pot, add your olive oil, onion, red bell pepper and garlic. Cook them for 6-8 minutes on medium heat, stirring occasionally until your onions are translucent.

Add your white ground turkey to the pot and turn up the heat to medium-high. Break up the turkey into small pieces using your spatula or a wooden spoon as it cooks. Continue cooking the turkey and breaking it apart until there are no spots of raw turkey left.

Add your all-purpose flour to the pot. Stir until combined and continue to stir occasionally while it cooks for another 5 minutes.

Pour your chicken broth into the pot and stir until the flour has dissolved into the broth.

Add your chili powder, cumin, dried oregano, paprika, and salt into the broth and stir until combined.

Drain your canned beans. Pour in your tomatoes and beans, stirring to incorporate them into the broth.

Bring the chili up to a boil and then turn the heat down to medium-low. Simmer for 20-25 minutes, stirring regularly to keep the chili from sticking to the bottom.

Serve immediately and top as desired. Enjoy!


Honeycomb Toffee

This crisp, airy candy is popular in the United Kingdom and is often coated in chocolate to help preserve its unique texture. It may seem intimidating to make at first, but it’s a fun and interactive dessert that’s easy to make. I recommend reading over the entire recipe before you make this candy, just to make sure you have everything ready to make it. We hope you enjoy this delightful candy recipe.

Ingredients:
½ cup granulated sugar
4 T honey
1 ½ tsp baking soda

Optional chocolate coating:
1 cup chocolate chips, melted
1 T coconut oil

Instructions:
Prepare a baking sheet by lining it with parchment paper. Set it within your immediate reach. The reaction to create honeycomb toffee happens very quickly and you’ll want the baking sheet near you to make pouring the toffee go smoothly.
Put your baking soda into a small cup or bowl and set it within your immediate reach. Place a spatula and whisk within your reach as well.
In a medium sized pot on low heat, add your sugar and honey. Whisk them together until they’re combined and continue whisking occasionally as the sugar dissolves into the honey.
Once the syrup becomes smooth and you see very few sugar granules in the syrup, turn the heat up to medium and continue whisking.
When your mixture has turned the color of maple syrup and is bubbling, turn off the heat. This will take almost exactly 3 minutes.
Get ready for the reaction to take place.
Grab the handle of your pot and add your baking soda. Quickly whisk in the baking soda and the reaction will begin.
Whisk until the baking soda is just combined and pour the toffee out onto the prepared baking sheet, scooping it out with your spatula.
When you pour the toffee, try to spread it out across the pan as you go. You cannot spread it by smoothing it out once you’ve poured it because you will crush the bubbles that give the toffee it’s texture.
Allow the toffee to cool, about 30 minutes.
Once it’s cooled, cut the toffee with a knife, or smack it to shatter it into smaller pieces.
Coat the honeycomb toffee in chocolate if desired.
To make the coating, add your coconut oil to your melted chocolate and mix.
I recommend using chopsticks to hold the toffee as you dip it in the chocolate.
Allow the chocolate to cool and set and serve. Enjoy!

Lamb Stew

Spring is around the corner, but there’s still a chill in the air. Warm yourself up with this comforting and hearty stew inspired by a classic Irish recipe, just in time for St. Patrick’s Day. Best of all, you don’t need a crock pot or Dutch oven to make this dish, just a reliable pot and some time. We hope you enjoy this scrumptious stew.


Ingredients:

1 lb. lamb stew meat (or beef if you prefer)
2 T neutral oil
2 lb. peeled and cut potatoes
1 cup peeled and roughly chopped carrots (about 4-5 medium carrots)
1 cup roughly chopped yellow onion
1 cup finely sliced leeks, cleaned (about 2 medium leeks)
2 T all-purpose flour
3 cups chicken stock
¼ cup chopped parsley
2 tsp chopped thyme
Salt to taste
Pepper to taste


Instructions:

Begin by preparing your vegetables. Peel and cut your potatoes and carrots.

In a large pot, add your chicken broth and a pinch of salt. Simmer on low heat.

Add your carrots and potatoes to the pot to allow them to cook first. Turn up to low-medium heat. Cover with the lid.

Chop and clean your leek. You can do this by cutting your leek in half lengthwise, stopping where the fronds start emerging from the stalk. Turn the leek over on its side by 90 degrees and chop again, cutting it into 4 segments. Fan out the sections on the inside of the leek, using the fronds as a handle. Wash out any dirt inside the leek. Press the sections back together and chop finely. Add it to your stew pot and cover.

Chop your onion, parsley, and thyme. Add them to the stew pot. Stir the pot to combine all the ingredients. Cover with the lid.

In a pan, add your oil and lamb stew meat. Cook on medium heat until the lamb meat has browned on both sides, about 7-8 minutes.

Remove the lamb from the pan, leaving the juices from the lamb and oil in the pan.

Sprinkle your flour into the pan and stir to absorb all the liquid. Add it to your stew and stir thoroughly to combine.

Add salt and pepper to your taste.

Turn up to medium heat and cover with the lid. Cook for 30 minutes on medium heat, stirring occasionally to ensure that nothing sticks to the bottom of the pot.

Serve immediately and enjoy!


Tiramisu Cake

We’ve re-imagined the classic tiramisu into a layer cake that is a surefire hit for any occasion. It has a lovely light texture from the sponge cake but maintains all the decadence and richness of the original dessert. This cake is perfect for a romantic dinner, dinner party or just when you’re craving a homemade dessert. It pairs wonderfully with our shrimp scampi recipe, and we hope you enjoy this recipe.


Ingredients:

For the cake:

4 eggs, room temperature
1 cup sugar
1 cup flour
1 tsp baking powder
1 tsp vanilla extract
2 T butter, melted
1 T hot water
½ cup strongly brewed coffee or espresso, cooled
Cocoa powder for dusting

For the filling and frosting:

(2) 8oz containers of mascarpone, room temperature
1 cup heavy cream
⅔ cup powdered sugar
Pinch of salt


Instructions:

Preheat your oven to 350℉.

Prepare two 8-inch cake pans by greasing them with butter or baking spray. Additionally, line the bottom of the pan with parchment paper that’s been cut to fit the inside of the pan. Lightly coat the pan with flour, pouring out any excess flour. Set the pans aside.

In a large bowl, whip your eggs with a hand mixer on high speed until they’ve become foamy. This may take 2 to 3 minutes.

Gradually add your sugar a few tablespoons at a time while mixing on medium-high speed. Once you’ve added all your sugar, keep whipping the egg and sugar mixture until it falls off the whisk in a thick ribbon. It may take up to 20 minutes to reach this stage. When you’re done whipping the mixture, set it aside.

In a medium bowl, add your flour and baking powder. Sift them together twice.

Add your dry ingredients to your wet ingredients and gently fold them in until they are just barely incorporated. Set the batter aside.

In a small bowl, add your melted butter, hot water, and vanilla extract. Stir them together until combined.

Add the butter mixture into your cake batter and stir until just combined.

Pour your cake batter into your prepared cake pans. Make sure the batter is evenly distributed between the pans.

Bake for 18 minutes, or until a toothpick inserted in the cake comes out clean.

Set your cakes on a cooling rack to cool.

While your cakes are cooling, you can prepare your coffee and filling.

Brew 1⁄2 cup of strong coffee or espresso. Set it in the refrigerator to cool while you prepare your filling.

In a medium bowl, add your mascarpone and a pinch of salt. Mix with a hand mixer on low speed until incorporated.

Pour in your heavy cream a little bit at a time and keep mixing until it’s combined with your mascarpone.

Fold in your powdered sugar by hand, or on a very low speed, then mix on medium speed to fully incorporate it into the filling. Set your filling aside.

You can now begin to assemble your cake.

Carefully remove your cakes from their cake pans, gently scraping them from the side of the pan with a butter knife. Flip them over and tap the bottom of the pan to release them.

Using a pastry brush, brush the cooled coffee or espresso onto the top of the cakes. Distribute the coffee evenly between the two cakes and make sure to completely coat the top of each cake.

Take ½ of your mascarpone filling and spread it evenly across the top of one cake layer, coffee-side up. You can do this using a butter knife or an off-set spatula.

Place your next cake layer on top of your mascarpone, coffee-side up.

Spread another layer of mascarpone evenly across the top of your cake. Make sure to leave a little bit to frost the outside of your cake when you’re done.

After your cake is assembled and frosted, dust cocoa powder on top using a sifter.

Once your cake is complete, you can store it in the refrigerator for up to 2 days or enjoy immediately.


Shrimp Scampi

This classic seafood pasta is guaranteed to impress and surprisingly easy to make. This dish comes together in just 20 minutes and can instantly transport you to a candlelit dinner at your favorite Italian restaurant in the comfort of your home. It’s perfect for a Valentine’s Day date night at home or when you want something delicious and easy to prepare. We hope you enjoy this simply scrumptious shrimp scampi.


Ingredients:

1 ½ medium sized shrimp (shelled and peeled)
½ cup chicken broth or dry white wine
4 tsp minced garlic
2 T butter
2 T olive oil
1 tsp salt
⅛ tsp red pepper flakes
Pinch of black pepper
⅓ cup chopped parsley
3 T lemon juice
1 (16 oz.) box of linguine pasta


Instructions:

If you have chosen to use frozen shrimp for this recipe, make sure you have thawed your shrimp.

In a large pot, bring water to a boil. Add your linguine pasta and cook until al dente, about 10 to 12 minutes. Stir occasionally to keep the pasta from sticking to the bottom of the pot.

When your pasta has finished cooking, drain it, and set it aside.

In a large saucepan on medium heat, add your butter and olive oil.

Add your garlic and cook until fragrant, about 2 minutes, stirring frequently.

Pour in your broth or wine, salt, black pepper, and red pepper flakes to the saucepan. Simmer on low heat until the broth has reduced by half.

Add your shrimp to the saucepan and cook them until they turn pink, about 5 to 6 minutes. If you’re using pre-cooked shrimp, sauté the shrimp until they are heated all the way through and fully coated in the sauce.

Add your linguine pasta, lemon juice and chopped parsley and stir until combined.

Garnish with extra fresh parsley and serve immediately. Enjoy!


Almond Chai Granola

Warm and comforting flavors are wonderful to shake off the chill of winter. This chai-spiced granola will have your kitchen smelling amazing and is perfect to enjoy for breakfast on cold mornings. Not only is it delicious, but you can make it using mostly ingredients from our bulk section! We’ve given it a make-over and have expanded the number of products we carry, in addition to returning the spice section to self-serve bins rather than single-use containers. We hope you enjoy the changes we’ve made and that you enjoy this recipe.

Ingredients:

4 cups old-fashioned oats
2 cups sliced almonds
½ cup warm honey
2 T safflower oil
1 tsp ground cinnamon
1 tsp ground cardamom seed
1 tsp ground ginger
½ tsp ground allspice
½ tsp ground clove
½ tsp vanilla extract
¼ tsp ground black pepper
¼ tsp salt


Instructions:

Preheat your oven to 300°F.

Line a large baking sheet with parchment paper and set it aside.

In a small bowl, warm your honey. You can do this by microwaving it for 15-30 seconds or heating it over the stove on low heat.

In a small mixing bowl, add your honey, safflower oil and vanilla extract. Stir to combine.

In a large mixing bowl, add your oats, almonds and spices. Stir to combine.

Add your wet ingredients into your dry ingredients and mix until all the oats have been fully coated.

Spread the granola evenly on your baking sheet and bake for 20 minutes.

After 20 minutes, take your granola out and stir it. Rotate the pan and bake it for another 5 to 10 minutes until the granola is golden brown.

When your granola is finished baking, allow it to cool for 30 minutes to an hour before serving. It can be kept in a sealed container for up to 3 weeks. Enjoy!


Carne Asada Seitan (Vegan)

This dish is a plant-based twist on the classic taco filling, carne asada. Did you decide to eat less meat in the new year? Whether you’re trying to stay true to your resolution or you’re a plant-based eater looking for a change of pace, this recipe might be exactly what you’re looking for. It’s deliciously reminiscent of your favorite taco stand and fills you up with plenty of protein. Inspired by a dish my partner makes quite often, this recipe is tried-and-true, and I hope you’ll enjoy it too!


Ingredients for seitan:
¾ cup vital wheat gluten flour
¼ cup flour
¾ cup water


Ingredients for marinade:
1 lime
2 cloves garlic
1 orange
1/2 cup chopped fresh cilantro
1/2 teaspoon salt
1/4 teaspoon black pepper
¼ cup olive oil
1 T cumin
½ T paprika
½ T chili powder
½ T italian herbs


Instructions:

In a medium mixing bowl, add your vital wheat gluten, flour, and water. Mix until a dough forms and knead with your hands for at least 3 minutes. Allow it to rest for 5 minutes before kneading it again for another 3 minutes. Set aside while you prepare to steam the dough.

Bring a large pot of water, about ¼ of the way full, to a boil. Find a metal colander or steamer basket that will fit on top of the pot without falling inside. If you have a pot with a steamer attachment, that appliance will also work. Spray your colander or steamer basket with non-stick cooking spray and place it on top of your pot.

Put your seitan dough into the steamer basket or colander. Cover it and allow it to steam on medium-high heat for 35 minutes. Check on it occasionally to make sure the water in the pot has not boiled off.

While your seitan is steaming, you can make the marinade.

In a small mixing bowl, add your chili powder, paprika, cumin, italian herbs, salt, black pepper, and olive oil.

Mince your garlic cloves and chop your cilantro. Add them to your mixing bowl.

Add the juice from your orange and lime into the mixing bowl. If you don’t own a citrus juicer, I recommend cutting them into 4 segments and squeezing them with your hands.

Stir your marinade until it is well combined. Set aside until your seitan has finished steaming.

Once your seitan is done steaming, allow it to cool down before you prepare it.

When your seitan has cooled, cut it into strips of your desired thickness. I recommended cutting it into ½ inch strips and cutting those strips in half.

Add your seitan to your marinade and stir until every piece is covered in the marinade. Allow it to rest in the refrigerator for at least 30 minutes.

Remove your seitan from the marinade and cook it in a skillet on medium heat until all the liquid cooks off and it becomes crispy, about 10 minutes.

Serve over rice or soft taco shells and enjoy!


Flourless Chocolate Torte

This torte is a true showstopper, making it a perfect treat to serve during holiday festivities. Inspired by one of my favorite bakeries, this torte is deliciously decadent and is easily the best chocolate dessert I’ve ever made. Inspired by the French dessert, la bête noire, it’s an instant favorite for chocolate lovers and those who enjoy rich flavors. I hope you enjoy this festive treat.

This recipe is naturally gluten-free, but it cannot be made vegan. I have not attempted to make this recipe dairy-free, but it could be done using vegan butter and coconut cream.

Ingredients:

For the torte:

1 Cup water
¾ Cup sugar
10 T butter (a stick and two tablespoons extra)
18 ounces 60% dark chocolate
6 large eggs


For the chocolate ganache:

1 cup heavy whipping cream
8 ounces milk chocolate (or dark if you prefer)


Instructions:

Preheat your oven to 350°.

Prepare a 10-inch springform pan or an 8×8 square pan by greasing it on all sides and on the bottom. Wrap the outside of the pan in 2 layers of aluminum foil. Locate a large baking pan with tall sides that you can fill with water during the baking process. Set these items aside.

In a small pot, bring your water to a boil. Add your sugar and simmer it over medium heat, stirring to dissolve the sugar. Allow it to simmer for 5 minutes. Remove it from heat and set aside.

In a large saucepan, melt your butter over medium heat. Add your 18 ounces of dark chocolate and whisk the mixture until it is smooth. Whisk in your sugar syrup and remove it from heat.

Allow the chocolate mixture to cool, until you could touch the chocolate without hurting your finger. It may take 10 to 20 minutes. This step is important, as it will ensure that you don’t scramble your eggs in the next step.

After your chocolate mixture has cooled, whisk in your eggs. I recommend adding 2 eggs at a time. Whisk the batter until it is smooth.

Pour the batter into your prepared pan. Place the torte pan into the large baking pan and fill it with water. Fill it until the water reaches halfway up the sides of the torte pan.

Bake the torte for 45 to 50 minutes. The torte is ready when it does not wiggle when gently shaken.

Allow the torte to cool in the fridge for 30 minutes to an hour before adding your ganache topping.

While your torte is cooling, you can make the ganache.

Add your heavy whipping cream to a small saucepan. Heat it over medium-high heat until it is very hot, but not boiling. Add your 8 ounces of chocolate and whisk to combine.

Pour the ganache on top of the torte and tap it gently on the table to make the coating even.

Allow the torte to cool in the refrigerator for another 2 hours before serving. Enjoy!