Onigiri
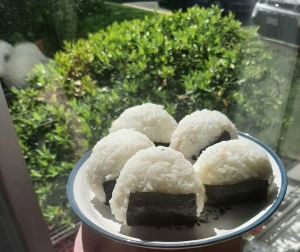
In honor of Asian-Pacific Heritage Month, we tried our hand at a popular Japanese snack. Onigiri, or rice balls, are made with different fillings wrapped in sushi rice and bundled with nori. This recipe is pretty hands-on and fun to make, plus it’s easy to customize with flavors you enjoy.
Ingredients:
1 cup uncooked sushi rice
1 ½ cups water
1 sheet sushi nori
1 can of tuna
1 T mayonnaise
¼ tsp soy sauce
Salt
Instructions:
Line a baking sheet with parchment paper. You can also prepare a long glass or ceramic serving dish and set it aside.
Wash your rice in a large bowl until the water runs mostly clear. You may have to fill the bowl and drain it 3-4 times.
Fill the bowl with 1 ½ cups of water and let the rice soak for 30 minutes. Set aside.
While your rice is soaking, make your filling and prepare the nori. We opted to fill our onigiri with a Japanese-style tuna mayo salad. There are several other fillings you can choose if tuna isn’t your speed, such as Japanese salted salmon, cod roe, or umeboshi (pickled plum). There are several online resources with recipes on how to make other onigiri fillings if you desire.
Drain you can of tuna and put it in a small bowl.
Using a fork, fluff out the tuna until there are no clumps.
Add your mayo and soy sauce, then mix them together with the fork until well combined. Set aside.
Using sharp scissors, cut your nori into 6 strips and set them aside.
When your rice has finished soaking, drain the water out completely.
Once your rice has drained, it’s time to cook it. You can use a rice cooker if you have one, or a large pot.
If you’re using a pot, put your rice and 1 ½ cups of water into the pot and bring them to a boil, covered.
Once it’s boiling, put it on low heat and keep the lid on. Cook for 12 minutes, then check on your rice. Check to see if there’s any water left in the pot. If there’s still water left, cook for another 2-3 minutes until all the water has been absorbed.
Take the pot off the heat but keep the lid on and allow it to steam for 10 more minutes. After the rice has finished steaming, fluff it and transfer it over to your baking sheet or serving dish. Spread it out so it has more surface area to cool, stirring occasionally to allow it to cool down more.
You want the rice to be cool enough to touch, but not completely cold so that you will still be able to mold it. Once it reaches a suitable temperature for you to touch, sprinkle it with salt and divide it into 6 equal portions.
Now you can start assembling your onigiri.
First, get all your components ready. Bring your tuna mayo, nori, salt, and a bowl of water next to your workspace. Divide the tuna mayo into 6 equal portions.
Lightly wet your hands with the water and put a little salt on them. This will stop the rice from sticking to your hands while you work.
Take one portion of rice and put it into the palm of your open hand, spreading it up to your fingertips and near your thumb.
Press it down and make a well in the very palm of your hand, then add a portion of tuna mayo and press it in. Close your hand, patting the rice around the tuna mayo to close it. Shape it into a ball the best you can without any tuna mayo falling out, then pat it into a round triangle.
Put a strip of nori on the bottom, as pictured, and set it aside.
Repeat.
Refrigerate the nori and pack them for lunches, snacks, or picnics. Lasts up to 3 days in the refrigerator before losing their freshness. Enjoy!