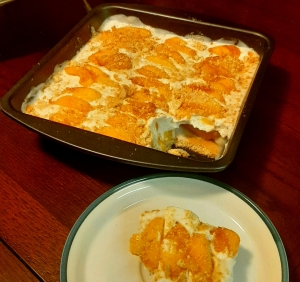
PB&J Cookie Bars (Vegan)

The classic peanut butter and jelly gets reimagined for dessert. These cookie bars are chock-full of rich peanut and sweet fruity flavor, just like your favorite childhood sandwich. These dessert bars can be made vegan for everyone to enjoy and they’re sure to fly right off the plate.


Ingredients:

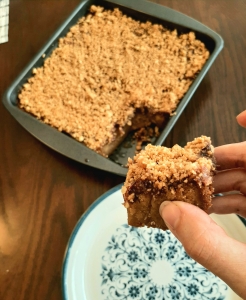
9 T unsalted butter (vegan or regular)
⅔ cup peanut butter
1 cup brown sugar
1 ¼ cup granulated sugar
1 tsp vanilla extract
1 ½ cups flour
½ tsp salt
½ tsp baking powder


For the topping:

4 sheets of graham crackers
1 T butter
1 T peanut butter
1 jar of jelly or jam


Instructions:

Preheat your oven to 350°

Grease an 8×8 or 9×9 pan with butter or line it with parchment paper

Melt your butter in a small pot over medium heat.

When your butter has melted, add the peanut butter, and mix until combined.

Transfer your mixture into a large bowl.

Add your brown sugar, granulated sugar and vanilla extract to the bowl and stir until combined.

In a separate smaller bowl, add your flour, salt, and baking powder. Mix until combined.

Pour your dry ingredients into your wet ingredients and stir until they’ve just come together. Be careful not to overmix.

Pour the batter into your prepared pan and create an even layer of batter with a spatula.

Bake for 25 to 30 minutes, or until the sides become golden brown and a toothpick inserted in the center comes out clean. Allow it to cool for 10-15 minutes before adding any toppings.

While your cookie is baking, you can make the topping.

Heat a tablespoon of butter in a small bowl or saucepan. You can use a microwave or a stovetop.

Crush your graham crackers into crumbs and add them to the bowl.

Add a tablespoon of peanut butter to the bowl.

Stir the ingredients to combine them. This can be done with a fork or spoon, but it’s much easier when done with your hands.

Once your cookie has cooled, you can begin topping it.

Spread an even layer of jelly or jam over the top of the cookie, about ½ an inch thick.

Sprinkle a layer of your graham cracker topping on top of the jam, making sure to cover all the visible jam.

Cut it into squares and enjoy!


Heirloom Shakshuka

Locally grown tomatoes have arrived at the Co-op this summer and we’ve got a delicious dish to share with you. This shakshuka recipe highlights the flavor of heirloom tomatoes and is perfect for breakfast or brunch. We recommend serving it with your favorite sourdough bread for dipping. We hope you enjoy this taste of summer!


Ingredients:

6 heirloom tomatoes
2 eggs
½ cup of water
½ yellow onion
2 garlic cloves
3 T extra virgin olive oil
2 Tsp paprika
1 Tsp cumin
¼ Tsp red pepper flakes (or to taste)
¼ Tsp salt
⅛ Tsp black pepper


Instructions:

Dice and seed your tomatoes. Locally grown heirloom tomatoes may have spots where the tomato has split and formed a tough skin. Remove these parts when dicing your tomatoes but leave the unblemished skins on. You can seed your tomatoes by gently squeezing them and scooping the seeds out with a spoon. As you seed your tomatoes, remove the hard white cores. Set your seeded and diced tomatoes aside.

Dice your onion. Peel and dice your garlic.

In a large skillet, add your olive oil, garlic, paprika and cumin. Cook for 5 minutes, or until the onions are translucent and the spices are fragrant.

Add your tomatoes, water, salt, and pepper to the skillet. Stir to combine the ingredients.

Cover your skillet and allow it to simmer on medium heat for 10 minutes.

Remove the cover and create two wells in the shakshuka. Crack your eggs into the wells.

Cook your shakshuka uncovered for at least 5 minutes or until your eggs have reached your desired consistency.

Serve with toasted sourdough bread and enjoy!


Peach Icebox Cake (Vegan)

Refreshing cold desserts are a great relief from the summer heat. This peach icebox cake can help you beat the heat and satisfy your sweet tooth. Using locally grown peaches and just a few ingredients from your pantry, this treat is simple to make and easy for everyone to enjoy.

Ingredients:

8 peaches
1 box vegan graham crackers
1 (15 oz) can of full-fat coconut milk

For the pudding:

Coconut milk + 2 T coconut cream
¼ cup sugar
½ T cornstarch
1 tsp vanilla extract

For the whipped cream:

Coconut cream
¼ cup sugar
1 T vanilla extract
1 tsp cornstarch


Put your can of coconut milk in the refrigerator for 3 to 4 hours before making your icebox cake. This will separate the coconut milk and coconut cream.

Peel, pit and slice your peaches. Set them aside.

Open your can of coconut milk. There will be a distinct layer of coconut cream at the top of the can. Scoop the coconut cream into a separate bowl and pour the coconut milk into a small pot. Take 2 tablespoons of the coconut cream and put it in the coconut milk, stirring to combine.

Set your coconut cream aside in the refrigerator.

Cook your pot of coconut milk over medium heat. Add the sugar, vanilla, and cornstarch to the pot. Whisk it constantly to dissolve the cornstarch and it thickens to pudding consistency. This will take 10-15 minutes.

Remove your coconut cream from the refrigerator to make your coconut whipped cream.

In a medium mixing bowl, add the coconut cream, sugar, vanilla extract, and cornstarch.

Whip the coconut cream using a hand mixer until soft peaks form.

Gather your coconut whipped cream, peaches, pudding, and graham crackers to assemble your cake.

In an 8×8 pan, add a layer of graham crackers to the bottom.

Pour your coconut pudding on top of the graham crackers.

Add a layer of peaches, saving some for the decoration on top.

Place another layer of graham crackers on top of the peaches.

Smooth the coconut cream on top of the graham crackers.

Top the cake with peaches and crumbled graham cracker pieces.

Refrigerate your icebox cake for 2 to 3 hours before serving. Enjoy!


Vegan Sloppy Joes

Sloppy joes remind us of summer cookouts or lazy dinners on the back porch when the heat of the day has faded away. We’ve recreated this classic dish using textured vegetable protein, a vegan protein that’s tasty and affordable, so everyone can have a bite. It comes together in just 20 minutes and goes great on your favorite sandwich bread. I hope you enjoy!

Ingredients:

6 ounces of dry TVP (textured vegetable protein – find it in the grocery aisle)
6 ounces of water
15 ounce can of tomato sauce
1 bell pepper (any color)
½ of a white onion
2 cloves of garlic
1 T olive oil
1 T salt
1 T ground pepper
3 T brown sugar
4 T chili powder
1 ½ T dijon mustard
2 T worcestershire sauce


Instructions:

Measure out 6 ounces of dry TVP and put it in a medium sized bowl.

Measure 6 ounces of boiling water and add it to your TVP. Cover it and set it aside. Your TVP should almost triple in size as it absorbs the water.

Mince your garlic cloves and dice your onions. Dice your bell pepper.

Cook your onions, bell peppers and olive oil in a medium sized pot until the onions are translucent. Add your garlic and cook until fragrant.

Add your tomato sauce, dijon mustard, worcestershire sauce and brown sugar into the pot. Stir over medium heat until combined and allow it to cook for 2-3 minutes while stirring occasionally.

Scoop your TVP into the pot and stir to combine it with your sauce.

Add your salt, pepper and chili powder to the sauce and stir to combine.

Allow the mixture to simmer on medium heat before serving.

When you’re ready to serve, spoon your TVP sloppy joes onto your favorite bun and enjoy!


Watermelon Granita (Vegan)

Beat the summer heat with a refreshing frozen treat you can make yourself. This watermelon ice is easy to whip up and only takes a few ingredients. It’s perfect for a hot day or a July 4th celebration, and wonderful when enjoyed with a sprig of fresh mint.


Ingredients:

4 Cups seedless watermelon

½ Cup sugar

½ Cup water

1 T lemon juice


Optional Toppings: 

Fresh mint leaves


Instructions:

Cut your seedless watermelon into small cubes, removing the rind.

Measure roughly 4 cups of your watermelon cubes.

Put your watermelon cubes in a blender and blend until smooth.

In a small saucepan, bring your water to a boil.

When your water is boiling, lower it to medium-high heat and add your sugar. Stir until your sugar is dissolved. Allow the sugar mixture to cool for 3-5 minutes.

Add the sugar mixture and lemon juice to your blended watermelon and stir to combine.

Pour your watermelon mixture into a large loaf pan. Put it in the freezer to set and cover the top of the pan.

Allow your watermelon granita to set in the freezer for 12 hours or overnight.

When you’re ready to serve your watermelon granita, thaw it at room temperature for 3 minutes. Scrape the top with a large spoon or fork and place the shavings in your desired bowl. Enjoy!


For an alternative preparation, you may pour the watermelon mixture into ice cube molds and freeze them. When you’re ready to serve your watermelon ice, pulse it in the blender 3-4 times until it becomes fluffy shaved ice.


Bean and Cheese Dip (Vegan)

Summer is in the air and outdoor get-togethers are a wonderful way to enjoy the company of friends and family. This bean and cheese dip is easy to make and it’s a tasty crowd-pleaser everyone can enjoy. Serve it alongside tortilla chips and dig in!

This recipe is easy to make vegan by using dairy-free cheese on top of the beans. We used Field Roast™ Chao vegan cheese in this dish and it came out wonderfully. When melting the vegan cheese, it may not melt at the same rate as regular cheese so use your own judgement to determine when yours dip is ready. You can also make this recipe ahead of time if needed. Instead of melting the cheese on top of the beans, simply store it in the fridge and bake the dip for 30 to 35 minutes before serving. I hope you enjoy this recipe!

Ingredients:

15 oz can of black beans
½ cup vegetable stock
¼ white onion
1 garlic clove
2 T fresh cilantro
½ T lime juice
½ T olive oil
¼ Tsp chili powder
¼ Tsp cumin
¼ Tsp salt (or to taste)
5 oz shredded cheese (vegan or regular)


Instructions:

Drain and rinse your black beans. Set them aside using the empty can or a separate bowl.

Finely mince your onion and garlic.

Pick the leaves off your cilantro, avoiding the stems. Mince the cilantro leaves and set them aside.

Add your olive oil, onion, and garlic to a medium sized saucepan. Cook on low to medium heat until your onions are translucent, and the garlic is fragrant.

Add your cumin and chili powder to the saucepan and stir to combine for one minute. This will allow the spices to release more flavor.

Add your black beans and vegetable stock and stir.

Cover the saucepan and allow the beans to cook on medium heat for 6 minutes.

Uncover the beans and smash them until they become soft and spreadable. You can do this using a fork, a large spoon, or a potato masher.

Add your minced cilantro, lime juice and salt.

Cook the beans uncovered for 2 minutes on medium heat, stirring occasionally.

Transfer the beans to your desired serving dish and spread it evenly on the bottom.

Sprinkle your shredded cheese on top in an even layer.

Melt the cheese in the oven by baking it for 15 to 20 minutes at 250°.

Serve with tortilla chips and enjoy!


Strawberry Shortbread Sandwich Cookies (Vegan)

Local strawberries have arrived at the Co-op and the possibilities for scrumptious strawberry desserts are endless. We decided to make these adorably delicious sandwich cookies using freshly sliced strawberries and vegan ingredients so everyone can have a bite. Serve them for dessert or as a sweet treat on a sunny afternoon


Ingredients:

For the cookies:

2 ½ cups all-purpose flour
¾ cups powdered sugar
1 ¼ cups softened vegan butter (unsalted)
½ tsp vanilla extract
1 T water


For the filling:

½ cup vegetable shortening or soft vegan butter (unsalted)
2 cups powdered sugar
1.2 tsp vanilla extract
½ T water
10-12 thinly sliced strawberries


Instructions:

Preheat your oven to 325°. Prepare two baking sheets with parchment paper and set aside.

In a large mixing bowl, add your flour and powdered sugar. Mix them to combine.
Add your softened vegan butter and vanilla.

Mix the dough with a hand mixer on medium speed until the dough is blended together. It will be
crumbly but just barely stick together.

Add your tablespoon of water. This will help prevent the dough from crumbling too much when you roll it and cut out your cookies.

Roll out your dough into a ¼ inch thick sheet. Make sure your rolling pin and surface are floured well to keep the dough from sticking. You can also roll the dough between two sheets of parchment paper if desired.

Use the cookie cutter of your choice to cut out your cookie shapes. Place your cookies on the prepared baking sheet.

You may continue rolling and cutting out cookies using the leftover dough. Depending on the size of your cookie cutter, you should have about 24 cookies. Make sure you have an even number of cookies to sandwich them in the final step.

Bake the cookies for 14-16 minutes, or until the bottom of the cookies are slightly golden brown. Allow the cookies to cool for 30 minutes.

While your cookies are cooling, you can make your filling.

In a medium sized bowl, add your powdered sugar, vanilla extract and water.

With a hand mixer, mix them on low speed until combined. Set aside.

Slice your strawberries and set them aside.

To assemble your sandwich cookies, spread about a tablespoon of frosting on the inside of each cookie. You can do this using a butterknife or a pastry bag.

For half of the cookies, place 2-3 slices of strawberry on top of the filling to create a layer.

Gently press another cookie on top of the cookies with strawberries inside. The filling will create a glue to hold the cookies together and keep the strawberry in place.

After you’ve assembled your cookies, place them in the refrigerator to help the filling set.

These cookies will hold up for 24 hours in the refrigerator if made ahead. Enjoy!

Tabbouleh (Vegan)

Warmer weather calls for a refreshing salad and this tabbouleh fits the bill. It’s bursting with bright spring flavors and fresh herbs. This dish is wonderful as a side at your spring barbecues or picnics for everyone to enjoy.


Ingredients:

1 cup dry bulgur wheat
2 large Roma tomatoes
1 cucumber
½ large white onion
1 bunch fresh parsley
1 handful fresh mint
2 T olive oil
4 T lemon juice
Salt and pepper to taste


Instructions:

In a small pot, bring 2 cups of water to a boil.

In a bowl, wash your bulgur wheat and drain the water from it. You can use a sieve, cheesecloth, or a colander with very small holes.

In a large bowl, add your bulgur wheat and boiling water. Cover it and set it aside to soak up the water for 6 to 8 minutes, until most of the water is absorbed.

Squeeze the excess water from the bulgur with a cheesecloth cloth or with clean hands.

Put the bulgur wheat back in your bowl and set it in the refrigerator to cool.

Finely dice your cucumber, tomato, and onion. Set aside.

Finely chop your parsley and mint. Set aside.

Remove your cooled bulgur wheat from the refrigerator and add your chopped vegetables and herbs.

Add your salt and pepper. I recommend using 2 T of salt and 1 T of pepper, but you can customize it to your taste.

Add your olive oil and lemon juice. Stir until all the ingredients are well combined.

Serve your tabbouleh as a side or enjoy it on its one as a refreshing snack. Enjoy!


Hummingbird Cake (Vegan)

Ring in spring with a delicious homemade hummingbird cake. This cake is sweet and moist with fruity flavors that get everyone excited for the warmer weather coming our way. It’s perfect for sharing or entertaining at any picnic or backdoor patio. On top of that, it just happens to be vegan so everyone can enjoy a slice of this scrumptious cake.


This cake is vegan and doesn’t call for many special ingredients. If you’re gluten-free, you can substitute the flour for gluten-free all-purpose flour. Additionally, if you have an allergy to walnuts or coconuts, these ingredients are easy to leave out. Omitting the pineapple and banana from this recipe will drastically change it’s flavor, so I don’t recommend removing these ingredients. If you’d like to boost the sweetness and fruity flavor of this cake, you can use applesauce instead of oil. However, the oil adds a richness to the cake and helps it bake more evenly. This cake is very moist and if you use applesauce, you may need to give the cake an extra 10 to 20 minutes to bake depending on the depth of your pan. To keep it from burning on top, place a sheet of aluminum foil over the cake after the standard baking time.


When baking this cake, you can use several different kinds of pans. I used a loaf pan for this recipe, but a round cake pan will work wonders as well. The batter makes enough to fit into two 6 inch cake pans, one 8 inch cake pan or a standard loaf pan. I recommend using a pan that is shallow when baking this cake. This cake is very moist and it will not bake evenly in a deep pan.


For the cake:

2 cups all purpose flour
1 tsp baking powder
1 ½ tsp baking soda
½ tsp salt
1 tsp cinnamon
½ tsp allspice
1 cup brown sugar (¾ Cup if your bananas are extremely ripe)
1 cup mashed ripe banana (about 2 large bananas or 3 small bananas)
½ cup crushed pineapple or pineapple chunks
¼ cup pineapple juice
1 T vanilla extract
¼ cup neutral oil (or applesauce)
2 T apple cider vinegar

Optional:

⅓ Cup coarsely chopped pecans
⅓ Cup shredded coconut


For the frosting:

½ cup vegan cream cheese (vegan butter or vegetable shortening)
2 cups powdered sugar
1 T vanilla extract
2 T dairy-free milk


Instructions:

Preheat your oven to 375° and prepare a large loaf pan or another dish by greasing it with oil, vegan butter or lining it with parchment paper.

In a large bowl, combine your flour, baking powder, baking soda, salt, cinnamon, and allspice. Mix them to combine.

Peel your bananas. Add them to a medium sized bowl and mash them until there are no lumps.

Add your sugar, pineapple juice, oil and vanilla into the medium bowl and mix until combined.

Add your wet ingredients into your dry ingredients.

Add your pecans and shredded coconut. Mix until combined. Be careful not to overmix and stop when the dough no longer has dry spots of flour visible.

Transfer the dough into your prepared pan and bake for 25 to 30 minutes, or until a fork inserted in the cake comes out clean.

Depending on the thickness of your pan, your cake may need longer. Shallower pans may only need 25 minutes while thicker pans may need up to 40 to 45 minutes.

When your cake is done baking, remove it from the oven and allow it to cool for 1 to 2 hours before icing it.

While you wait for the cake to cool, you can make your frosting.

In a large bowl, add your vegan cream cheese. You can also use vegan butter or vegetable shortening in this recipe.

Add your vanilla extract and dairy-free milk to the bowl.

With a hand mixer, mix the ingredients until they are combined.

Add your powdered sugar in batches and mix using the hand mixer on medium speed. This will ensure that you don’t throw a cloud of powdered sugar back onto yourself while mixing.

After all the sugar is incorporated, mix the frosting on high speed until it becomes smooth and fluffy, which may take about 2 to 3 minutes.

Place your frosting on your cooled cake however you’d like. You can use a piping bag, a knife or a spoon to decorate it.

Enjoy!


Lightened-Up Deviled Eggs

Spring has finally arrived and it’s the perfect opportunity to enjoy some of your favorite warmer-weather foods. These lightened-up deviled eggs are right on time for the upcoming Easter holiday and they’re downright delicious. We’ve lightened them up with some plain greek yogurt in place of mayonnaise and without skimping on their classic flavor. They’re perfect as a snack or appetizer and are perfect to take on a sunny picnic. I hope you enjoy these delightful deviled eggs.


Ingredients:

6 large eggs

¼ cup plain greek yogurt

1 tsp apple cider vinegar

1 tsp dijon mustard

¼ tsp salt (or to taste)

⅛ tsp pepper (or to taste)

Optional:

Paprika for dusting

Chopped chives to sprinkle on top

Instructions:

Place a large pot of water to boil on the stove.

After the water comes to a boil, place your eggs in the boiling water gently. I recommend dropping them in with a spoon. This ensures that the shells will not crack open when they hit the bottom of the pot.

Boil your eggs for 13 to 14 minutes.

While your eggs are cooking, prepare a large bowl with water and ice.

When your eggs have finished cooking, drain the water and place your eggs in the ice water bath to cool them.

When your eggs have cooled, remove their shells. I find that using a spoon works the best. Gently hit your eggs with the back of a spoon in one or two spots. Then carefully peel the eggs.

Once all your eggs are peeled, wash them under cold running water to remove any eggshell pieces. Dry your eggs after washing them.

Cut each egg in half.

Using a spoon, remove the yolks from each egg and place them in a small bowl.

After you’ve collected all the yolks into your bowl, add your vinegar, greek yogurt, dijon mustard, salt and pepper. Mix it well.

Transfer the mixture into a piping bag. You can also use a plastic sandwich bag. Simply cut off a small piece of one corner if you don’t have a piping bag.

Pipe the mixture into the empty spaces of your eggs. I like to start by filling each one to where it meets the egg whites. Then I go back with more filling after I’ve completed each egg.

After filling the eggs, dust them with paprika and chopped chives if desired. Enjoy!