Sweet & Spicy Summer Rolls (Vegan)
These vegan summer rolls are the perfect snack when you’re craving something fresh and flavorful. Packed with filling veggies and a balance of sweet and spicy, you’re bound to make these rolls all summer long. We hope you enjoy this recipe.
Ingredients: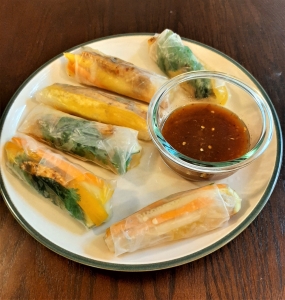
1 firm ripe mango
1 large carrot
½ medium cucumber
1 medium yellow bell pepper
4 oz firm tofu
¼ cup basil leaves
¼ cup cilantro leaves
6 rice paper wrappers
¼ cup neutral oil (or more if needed)
3 T water
3 T cornstarch
1 T sambal oelek
1 T soy sauce
1 T maple syrup
For the dipping sauce:
1 T sambal oelek
1 T soy sauce
1 T maple syrup
Instructions:
Prepare your vegetables. Peel your carrot and cucumber. Cut the top and bottom off your bell pepper, remove the seeds and pith.
Cut your carrot, cucumber and bell pepper into matchstick-size strips and set aside.
Cut your mango in half and separate the pit from the fruit. Remove the fruit from the peel. Cut the mango fruit into thin wedges and set aside.
Roughly chop your basil and cilantro. Set aside.
Drain your tofu and cut off 4 ounces from your block of tofu. This is about ⅕ of a block, for reference.
Cut your tofu into 1-inch strips. Set aside.
In a large skillet, add your oil and set to medium-high heat. You can test if the oil is hot enough to fry the tofu by flicking a little water into the pan. If it sizzles and bubbles, you’re ready to start frying.
In a small bowl, add your water and cornstarch. Stir well until combined.
Dip each piece of tofu in the cornstarch mixture and let the excess drip off. Carefully place them in the skillet and fry until golden, flipping them over occasionally to make sure each piece fries evenly. You may have to do this in batches, depending on the size of your skillet.
As your tofu strips finish frying, transfer them to a small bowl.
Once all the tofu is done, add your sambal oelek, soy sauce and maple syrup to the tofu and toss gently to coat it evenly. Set aside.
Get all your ingredients close by to begin making your summer rolls. I recommend having a space to fold your rolls, like a cutting board, and a separate plate to set them on once they’re done.
Take a large dinner plate and fill it with warm water. Dip your rice paper into the warm water for about 5 seconds, until every part has touched the water.
Quickly lay the rice paper down on the cutting board and assemble your roll. Put your cilantro and basil on the rice paper, towards the bottom but not on the edge. Stack your carrots, cucumbers, peppers and tofu on top of the herbs.
Fold the bottom edge of the rice paper over your filling. Fold in the two sides, then roll towards the top edge of the rice paper until it is sealed. Make sure to move quickly, or the rice paper will become too sticky and difficult to fold. Set the roll on your plate and repeat until you are finished.
In a small dish, make your dipping sauce.
Add your sambal oelek, maple syrup and soy sauce. Stir to combine.
Serve your summer rolls with your dipping sauce and enjoy!